How we used Neural network, Replicate.com, and WebGL to generate photorealistic 3D avatars for the GitNation portal`s users
Discover the fascinating journey of harnessing the power of Neural networks, and WebGL to revolutionize user experiences on the GitNation portal. In this article, we delve into the innovative techniques and technologies employed to generate photorealistic 3D avatars that captivate users like never before. Explore the seamless integration of Replicate`s deep learning capabilities, cutting-edge AI algorithms, and the rendering prowess of WebGL to bring these avatars to life.

Avatars are an integral part of any social portal. It is important for people to see the person they are interacting with, photography creates a personal connection and enhances the user experience. But what if we go further and use AI and WebGL to turn every user photo into an interactive 3D avatar?
![]() image 1
image 1
Requirements for the solution - to work on one photo uploaded by the user. Be cheap and reliable enough to process thousands of photos.
At the moment, there are several technologies that allow you to reconstruct 3D portrait data from a photograph of a person, but the only one reliable enough for production is the depth map.
What is a depth map?
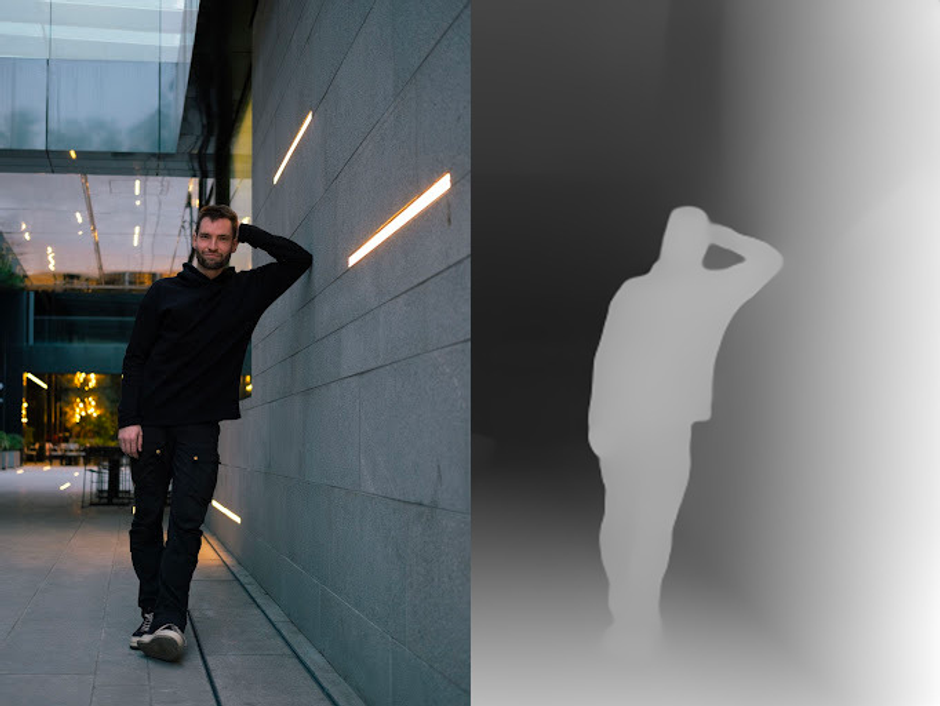
The depth map is an image complementary to a photo where each pixel stores the depth of the scene.
![]() image 2
image 2
The web does not have built-in components for displaying images with a depth map. This requires WebGL, some JS and a custom shader. Fortunately, there are ready-made components like react-depth-map
How to get a depth map for a photo?
Previously, the only way to get a depth map was to scan the surface with laser scanning at the time of photographing. Luckily, advances in AI and ML have made it possible to reconstruct pixel depth from a single photo. You can read more about the method here, and the practical implementation of the neural network is at the PyTorch hub.
You can play online and make a depth map for your photo on Huggling face. I tested Midas on 10 user photos and it became clear that the reliability is high enough, it can work.
Implementation
The chosen solution was to store the path to the depth map in a separate field in the database, generate a depth map daily with a cron job, save the URL to the file in that field, and clear its value when a user uploads a new photo. If the field is empty, then there is no depth map for this user and we display the standard <image> tag.
Run Midas as a Cron job
This was a remarkable problem as the neural network is extremely slow without a GPU. The first thing I tried was to buy a GPU instance from https://runpod.io and run the project there. This approach lead to dozens of problems with the installation and after their resolution, the cost of renting a GPU instance still remained a problem.
Having searched a little, I came across a wonderful service https://replicate.com/ - these guys have already deployed all known neural networks, including Midas, into the cloud. Look at the entire list, you may find a solution to your other problems!
The ultimate cron job for generating avatars is a Node.js script that runs daily:
for (const user of usersWithoutDepthMaps) {
    queue.enqueue(async () => {
        await updateDepthMapForUser(user);
    });
}

function updateDepthMapForUser(user: User) {
    const output = await replicate.run('cjwbw/midas:a6ba5798f04f80d3b314de0f0a62277f21ab3503c60c84d4817de83c5edfdae0', {
        input: {
            model_type: 'dpt_beit_large_512',
            image: user.avatar,
        },
    });
    await downloadFile(output, getDetphMapFileName(user));
    const depthMapUrl = await uploadFileToCloudianryNode(getDetphMapFileName(user));

    await db.user.update({
        where: {
            id: user.id,
        },
        data: {
            avatarDepthMap: depthMapUrl as string,
        },
    });

    console.log('Updated depth map for', user.name);
}
Display
We have a depth map. How to display them? Because The GitNation portal is written in Next.js it makes sense to use react-depth-map. The component using it looks something like this:
export function Public3dAvatar({ user }) {
    return (
        <ImageDepthMap
            key={user.id}
            originalImg={getSquareCloudinaryImage(user.avatar)}
            depthImg={getSquareCloudinaryImage(user.avatarDepthMap)}
            verticalThreshold={35}
            horizontalThreshold={35}
            multiplier={1}
        />
    );
}
Unfortunately, out of the box, react-depth-map gives a strange artifact where the avatar splits into two:
![]() image 3
image 3
The reason is that the shader is written in such a way that the back of the scene is displaced in the opposite direction from the foreground. This works well for depth maps with multiple depth layers, but often breaks avatars. The solution was to fork the component and fix the pixel shader, greatly reducing the back clipping.
![]() image 4
image 4
And the final result:
![]() image 5
image 5
Conclusion
Seeing the progress of AI technology is an absolute excitement! It is hard to predict how they will change the technology in the next few years, yet they have already given a fresh, previously impossible-to-have look to our portal, all speakers have received nearly free 3d avatars, and users have received a fresh design solution.
Also here is the page where you can unlock the insights of Adron - a seasoned expert in C#, JavaScript, Go, and a variety of other languages. Gain a unique polyglot perspective and discover the optimal technology stacks for your projects.


