

This article explores our journey in creating a custom CMS for a significant client, focusing on the features including the labels system, environments, and custom tokens for consuming content per environment and per label.
A Peek into the Project
Our journey started with a large company with over 50 developers across different teams. For three years (and counting), we have been implementing a headless CMS using Sanity Studio, serving as a central content store for various teams developing different frontend applications.
The project specifics include:
- CMS: Sanity Studio was utilized, and several custom solutions were developed on top of it.
- Sanity Plan: Enterprise plan.
- Number of Content Types: 98 document types were divided into 5 categories for improved navigation, plus around 20 additional types used within documents.
- Number of Environments: 5 - production, regulator, staging, integration, and development.
- Label System: Each US state is represented by its own label, covering 6 states with our labels and a common white label.
- Datasets: 3 base datasets for production, regulator, and staging, and 5 additional datasets for backups, CMS development, and testing.
- Documents: 165,000 across all datasets.
- CMS users: 122 members.
- Sanity CDN Usage: Over 75 million requests per month.
Project structure and implemented features
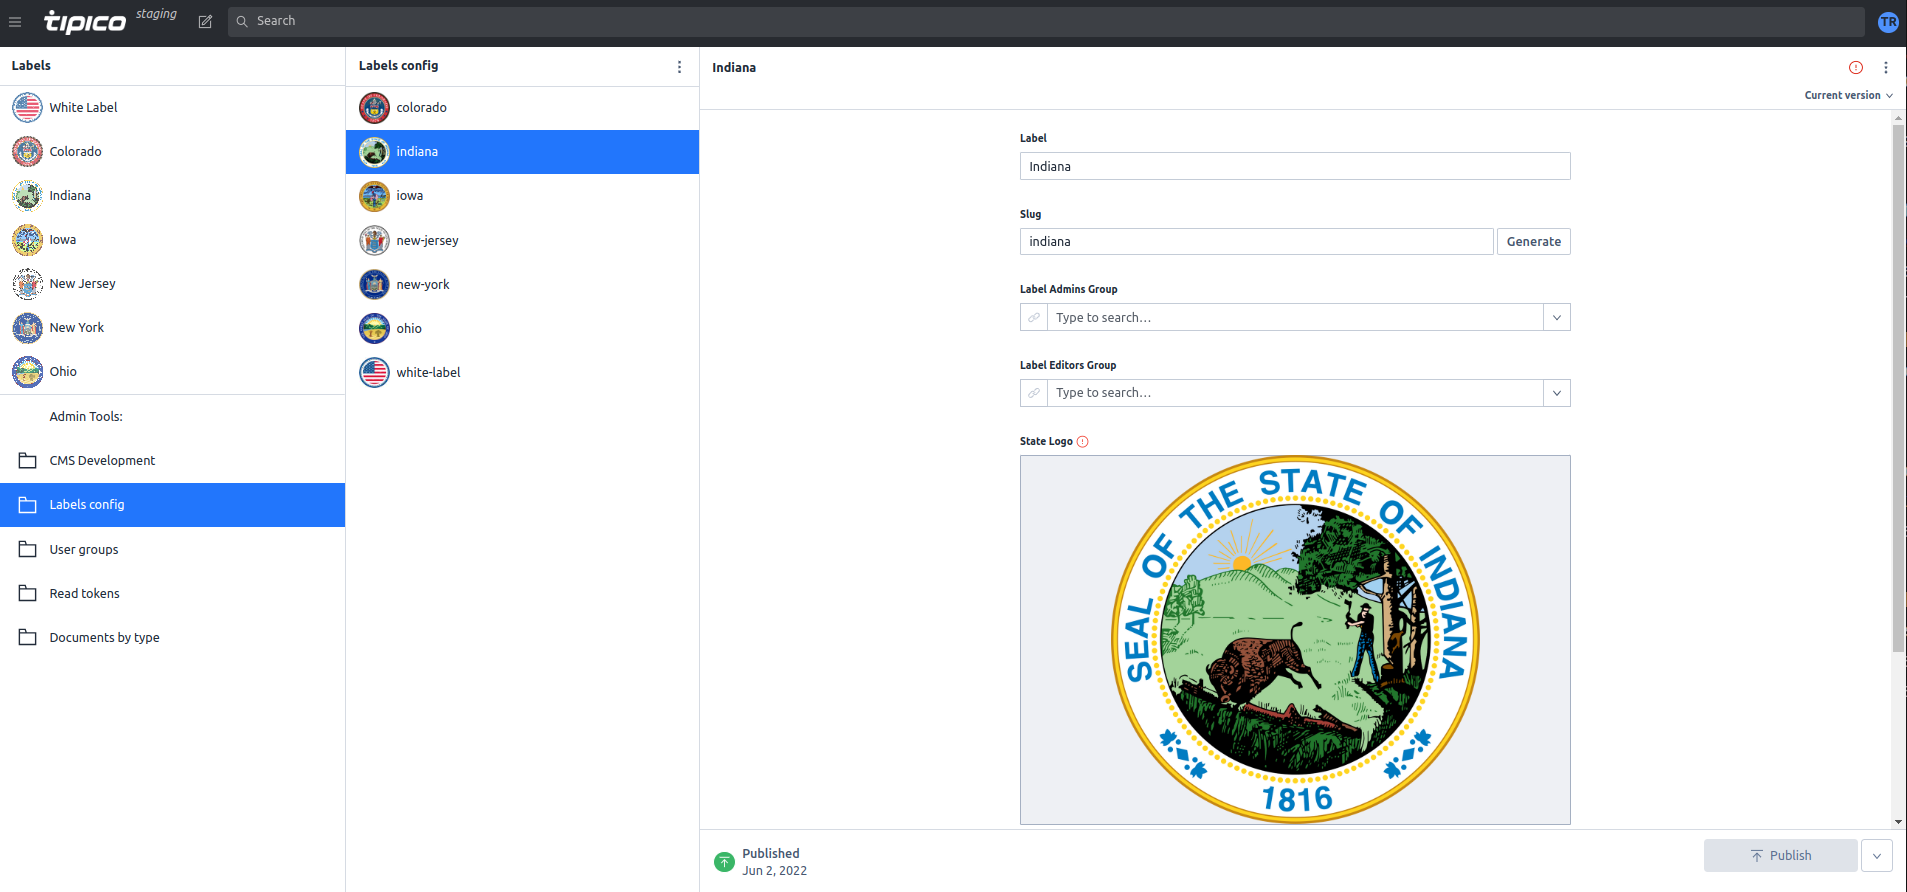
1. The Labels System
The client we were working with had a rather unique requirement: they needed separate teams of editors for each US state, each handling their own set of documents. Additionally, they required a common pool of documents, referred to as the White Label, accessible by all states by default until replaced or removed by the respective state’s team.
 labels system
This requirement pushed us to devise a label system that could cater to these needs. With this label system, any White Label document could be accessed from a state label as a shared instance, allowing the state’s editor team to view but not edit these common documents. The editors could perform the following operations on these documents:
- Fork document: Create a local duplicate of a document for editing. Changes only affect the current state.
- Remove document: Hide the document from frontend applications operating in that state.
- Reset document: Discard local changes on a forked document and switch back to the common version.
- Restore document: Bring back a removed document to that state.
The label system was implemented using a custom structure builder within Sanity Studio. This provided an interface where users could select the necessary label in the first column and navigate through categories and document types. Depending on the document’s origin, labels such as “shared”, “own”, “forked”, or “removed” would be displayed.
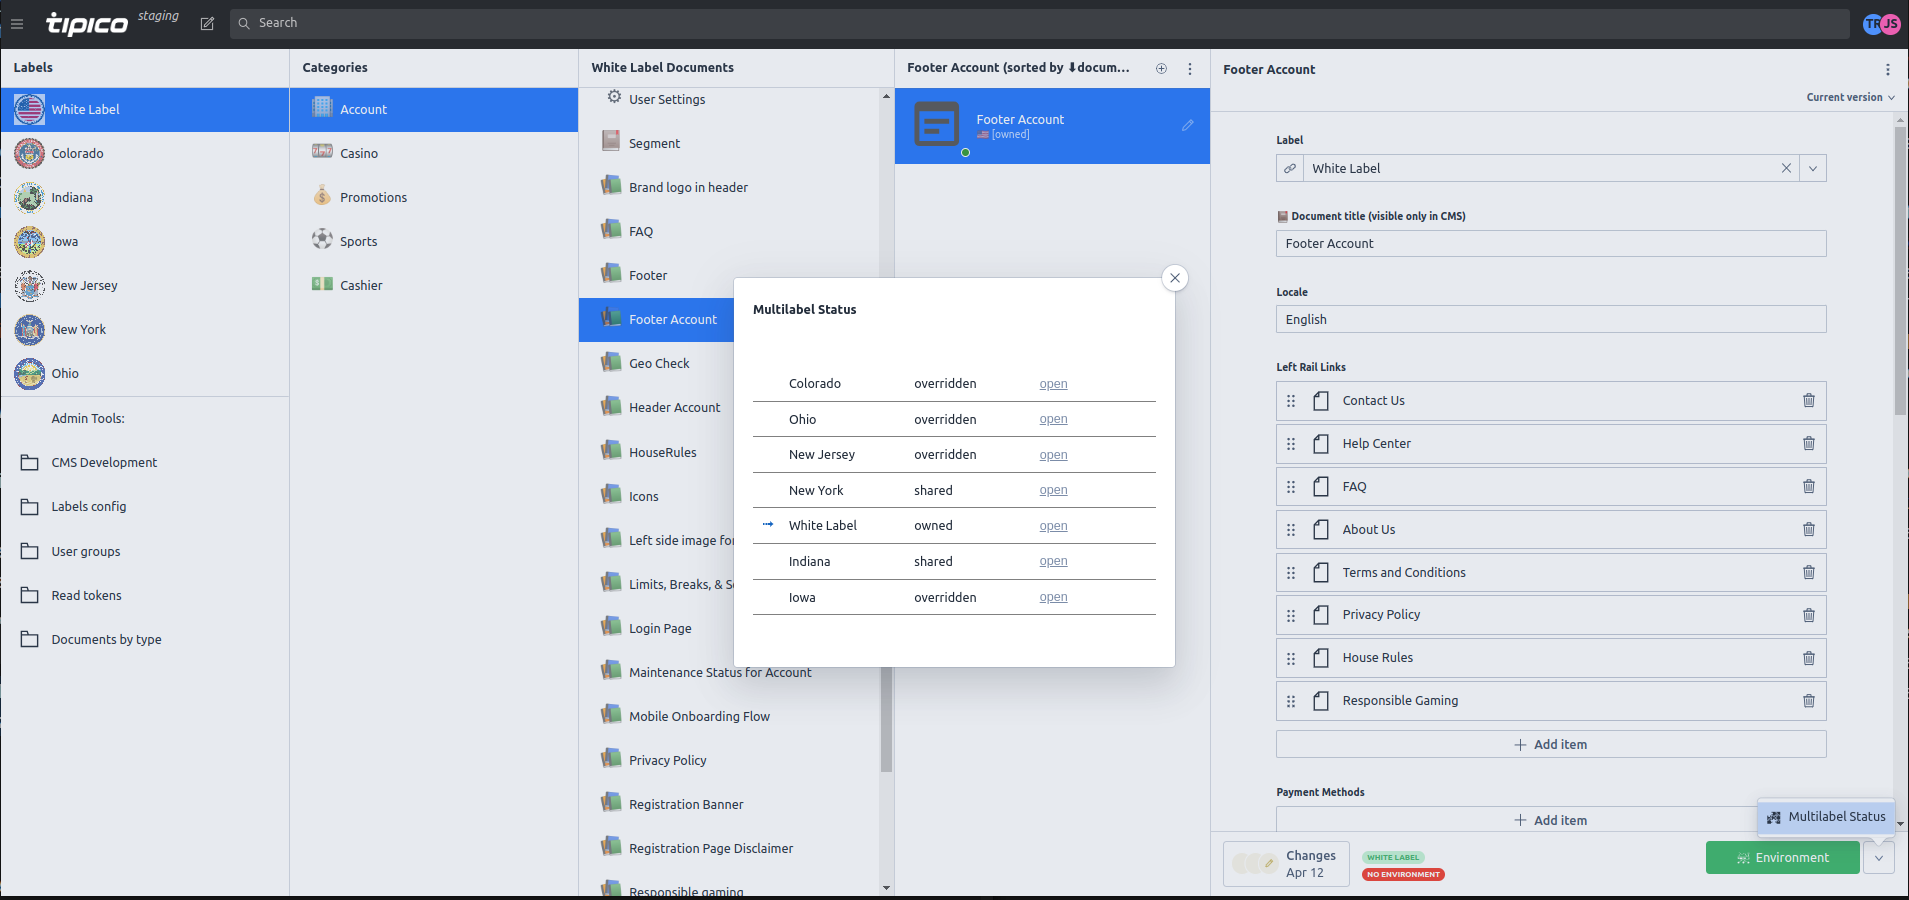 label statuses
During the implementation, we faced a challenge when some editors had the authority to act as both a chief White Label editor and a local state editor. In such cases, we needed to differentiate the user experience and restrict the editing of shared White Label documents if accessed through a state label route. To resolve this, we introduced a read-only mode to safeguard common documents from accidental editing.
Developing a custom label system on Sanity Studio was a unique challenge that required us to delve into the intricate details of the Headless CMS. Despite the limitations we faced, our commitment to meeting the client’s needs kept us motivated. We did not shy away from exploring the source code of Sanity Studio or reaching out to Sanity support for assistance.
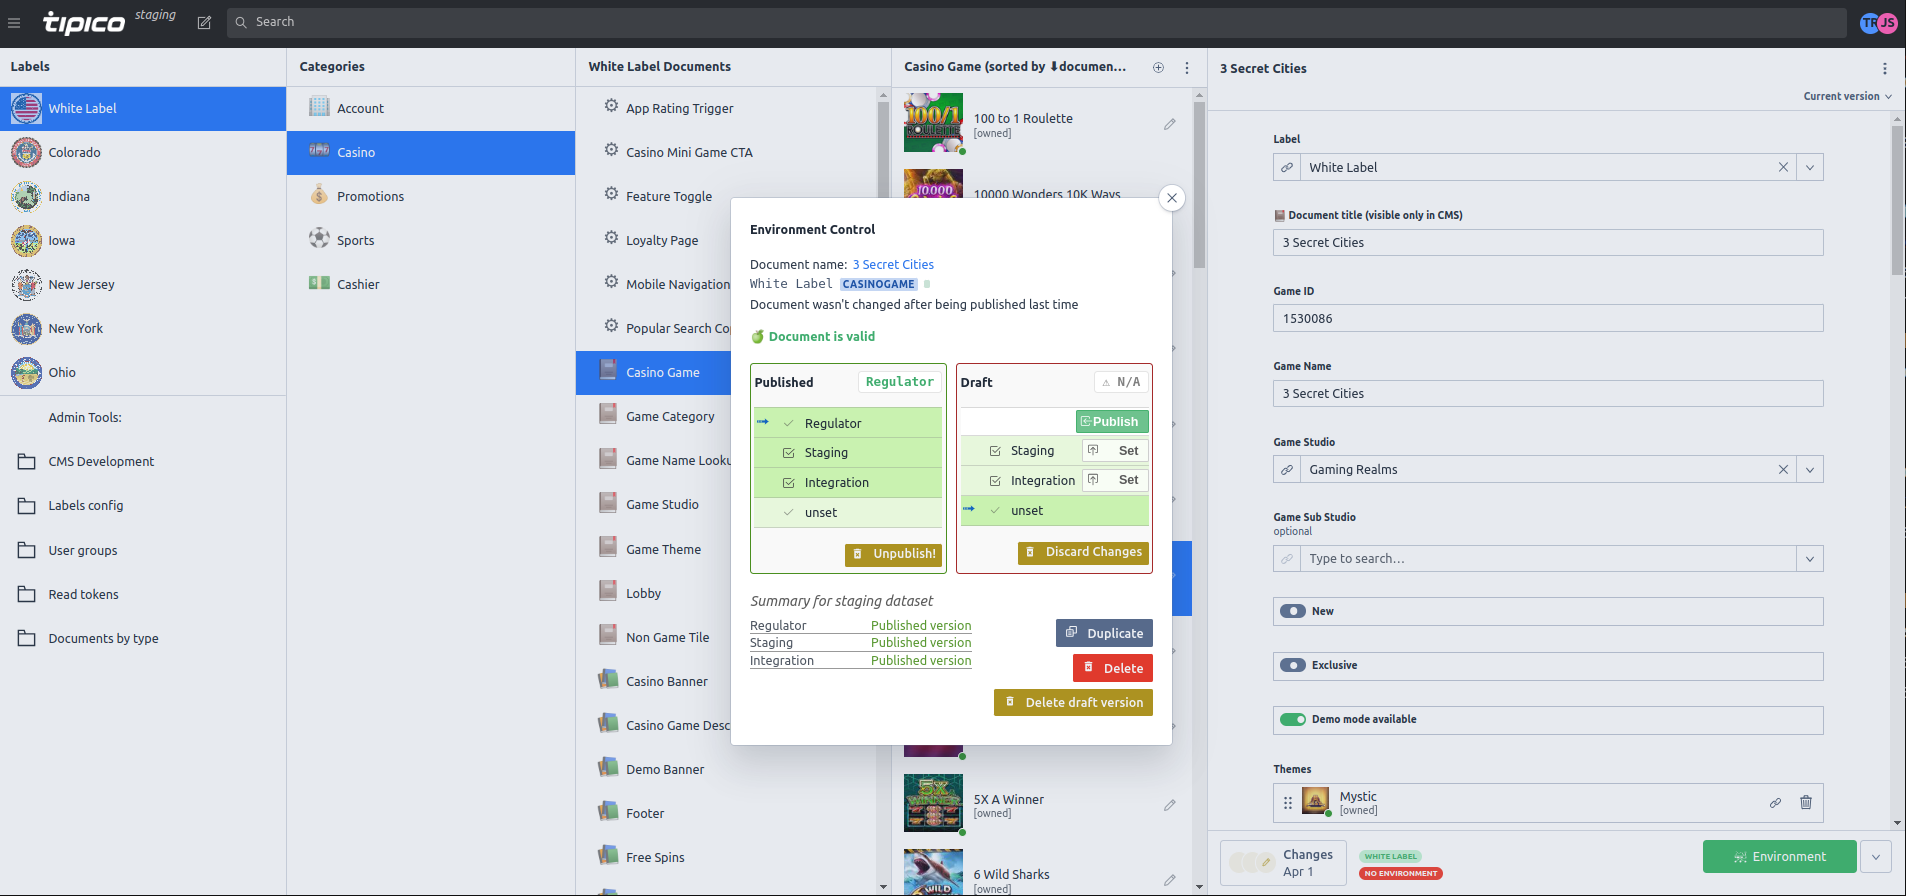
2. Environments
In a standard CMS setup, there are typically two environments - Published and Draft. However, for more complex projects, this traditional approach may not suffice. For instance, consider a large company with a multitude of teams, each developing different frontend applications. The need for a robust content model that serves as a central content store for these diverse teams necessitates a more flexible environment structure.
 custom environments
In response to such needs, we’ve extended the standard publishing flow in Sanity Studio to include five different stages - Production, Regulator, Staging, Integration, and Draft. This setup allows each document to pass through these stages, maintaining two versions - one for production and another for preview on one of the environments below. Moreover, each dataset has its dedicated set of environments.
Implementing new stages in the Sanity content model involved meticulous planning and execution. We introduced three new stages - Regulator, Staging, and Integration - each serving a distinct purpose in the content life cycle.
- Regulator: This stage is used for regulatory checks and approvals. It ensures that the content adheres to the guidelines set by the regulatory authorities.
- Staging: The staging environment is used for testing. It serves as the final checkpoint before the content is pushed to production.
- Integration: This stage is used for integrating the content with various frontend applications.
With the introduction of new stages, we still remain two revisions of the document - one for production and another (draft revision) for editing and previewing on the environments. This required a slight upgrade on top of the base Sanity document structure. Each document now includes fields to store the current environment and a reference to a draft revision.
To add another layer of flexibility, we introduced dataset-specific environments. Instead of having a common set of environments for all datasets, each dataset now has its own subset of environments. This allows more granular control over the content flow and separate developers from production and regulator’s content.
Introducing extended environments in Sanity Studio had its challenges. The main hurdle was preserving the existing workflow while implementing the changes. To overcome this, we made incremental changes and thoroughly tested each one before moving forward. Another challenge was educating the teams about the new environment structure. We conducted training sessions and provided detailed documentation on using the new features.
3. Custom tokens for consuming content per environment and per label
Custom tokens, in the context of Sanity, serve as gatekeepers that control and direct the flow of content to different frontend applications. They are the keys that unlock access to specific content, dictated by their unique filtering settings. Each token can be assigned to a particular state or environment, restricting content fetching to that specific context only.
Utilizing custom tokens in Sanity involves implementing a filtering logic via the GROQ permission system. This process results in the creation of a host of tokens, each with its unique filters. Consequently, each state and environment receives a distinct token that restricts content fetching to that particular context.
The implementation of custom tokens in Sanity is not without its challenges. The main obstacle lies in ensuring the coverage of not just own label documents directly, but also shared, removed, and forked documents. This intricate task requires the designing of a robust document relationships system that was created on top of Sanity’s default system. To overcome these challenges, a custom logic was implemented. This involves the introduction of additional technical fields for each document and the rewriting of standard document actions in Sanity Studio.
Implementing custom tokens in Sanity brings about several benefits. Firstly, it simplifies the content fetching process for frontend teams. By providing each team with a token tailored to their specific context, the task of content fetching becomes streamlined and efficient. Secondly, it ensures the consistent application of content fetching rules across all states, frontend applications, and environments.
4. Migration tool
 migration tool
We have developed a custom document processing plugin for Sanity Studio, which serves as a powerful tool for various document-related operations. This tool allows us to seamlessly migrate documents between datasets, efficiently process and update documents, and perform targeted searches within documents. The functionality of this tool is based on a extendable set of pre-created scripts that can be easily launched by users.
One key aspect to highlight is the safety and security of the operations performed by the migration tool. All actions are executed on behalf of the user who initiates the script, ensuring that the operations are strictly restricted by the user’s permissions. This safeguard provides peace of mind and reassurance that only authorized actions are carried out.
5. Custom document previews
In order to enhance the user experience and provide comprehensive information, we have implemented custom document previews. When a document is displayed as an item in a list, these previews showcase additional options and properties associated with each document. This includes displaying the document’s multilabel status, environment status, and locales. Furthermore, in cases where the lifespan of a document is specified, this valuable information is also included in the list.
By incorporating these custom document previews, we aim to empower users with a holistic view of the documents, enabling them to make informed decisions and efficiently navigate through the content. The inclusion of relevant details enhances the usability and effectiveness of the list view, facilitating smooth and seamless document management.
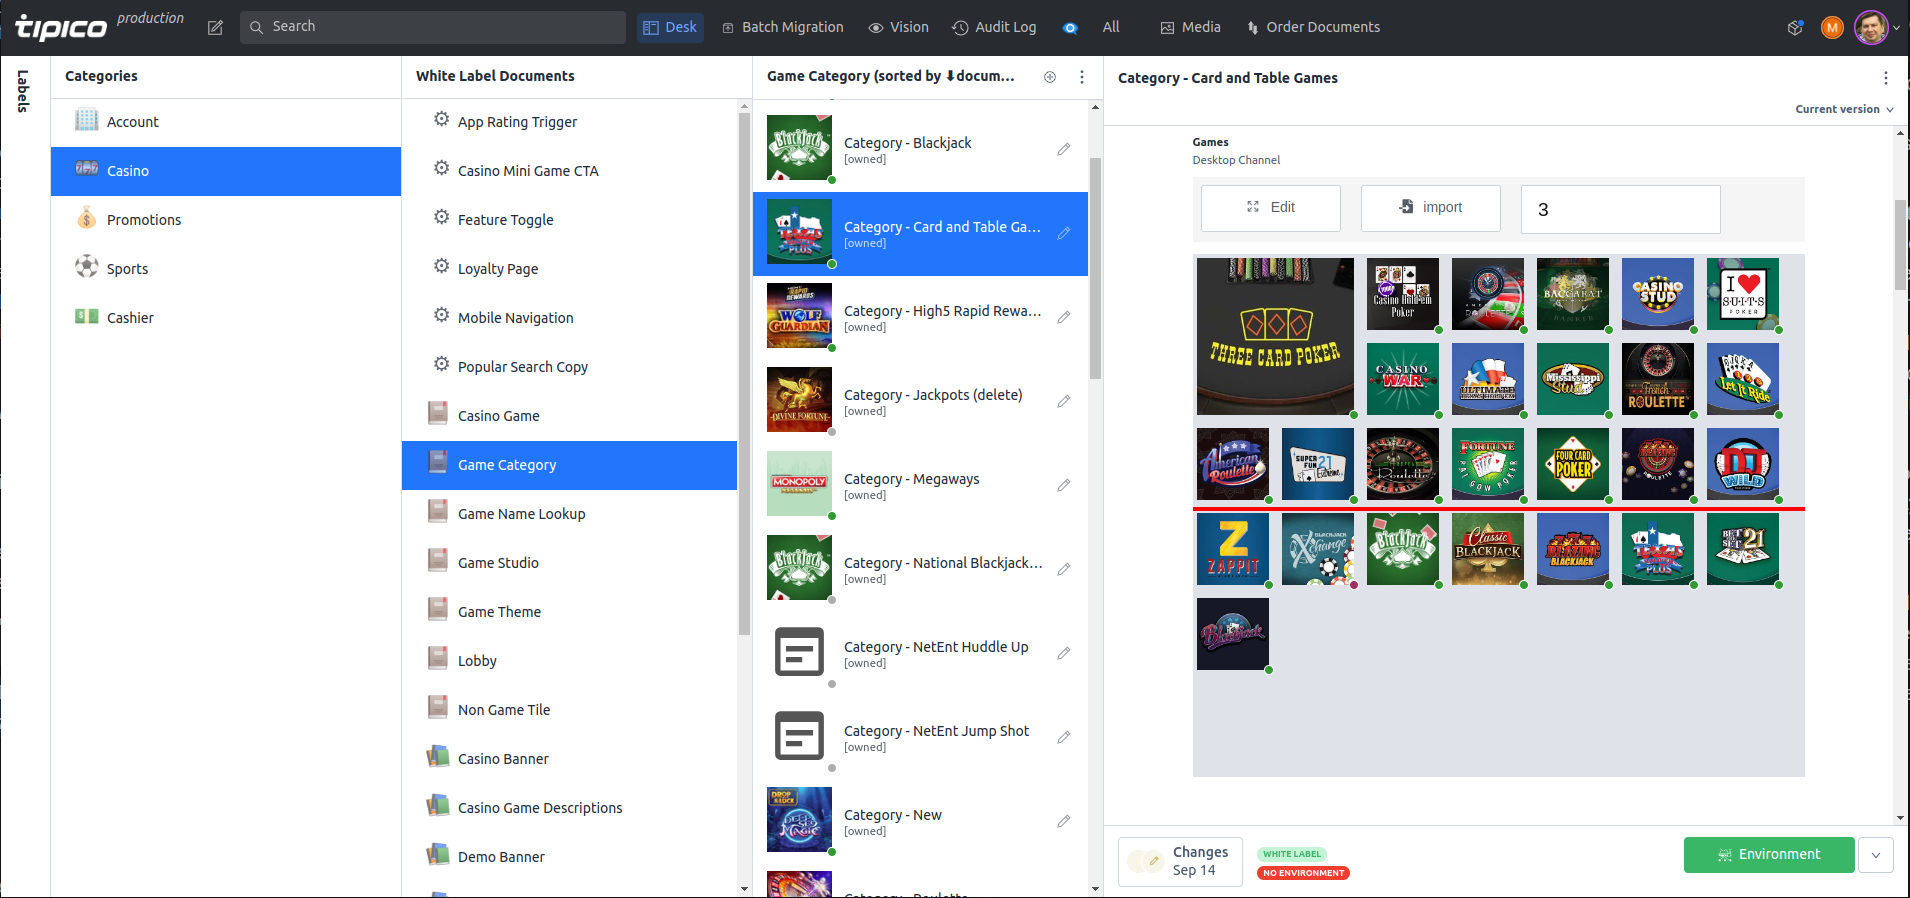
6. Various list layouts
With a wide range of scenarios for the number of documents of a certain type, we needed to handle this in a user-friendly way. The range of cases varies from a single document per specific type to thousands of documents. There are some noteworthy edge cases:
- Singleton documents: These are document types that assume only one instance per label. This means that once created, the document will be shared across all labels. However, editors can fork the document and have their own version, still in singleton format. It is important that we handle errors where another document accidentally appears. In this case, we gently highlight the issue and allow users to select which document should remain. This is crucial for the frontend case, as when they fetch the document, they need to rely on the fact that the first document they receive is the correct one and do not need to perform additional checks.
- Singleton with target environments: This is an extended version of the singleton, where we allow one document per label and per environment. This was requested for complex cases where the frontend needs to maintain apps on different environments with their own settings. In this case, it is not covered by our default environment system, which only has two revisions passing through each environment.
- Lists with additional sorting and grouping: In cases where there are a sufficient number of documents in a list, we offer additional features for sorting documents based on their references. A good example of this is the casino games documents, where each game has a reference to a game studio. For better navigation, we have implemented sorting by studios. Moreover, we have included the studio names as headers in the documents list to separate each group.
- In the most complex cases, where editors have created hundreds of documents, it becomes critical to avoid lags and performance issues when working with such long lists. Additionally, it is difficult to navigate through such a long list. To address this, we have introduced an additional column with folders to organize documents based on a certain property.
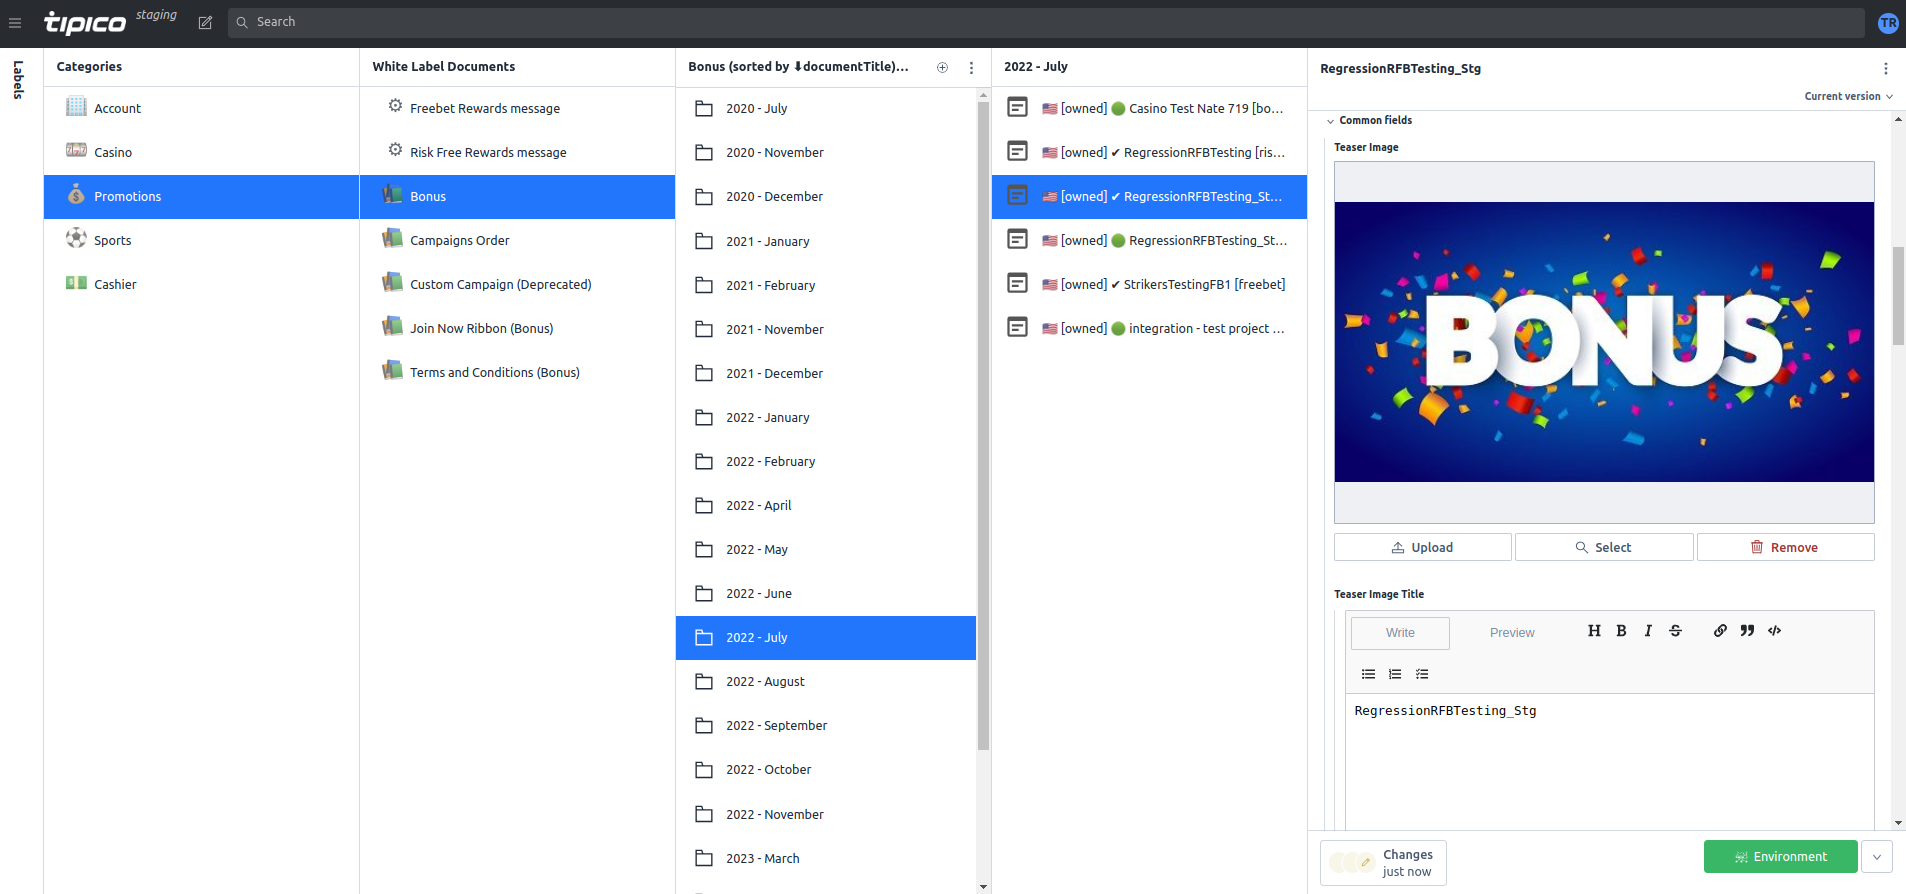 document-list
To implement all these types of document outputs in combination with the labels system, we had to significantly extend the default logic of the structure builder.
7. Audit Log Plugin
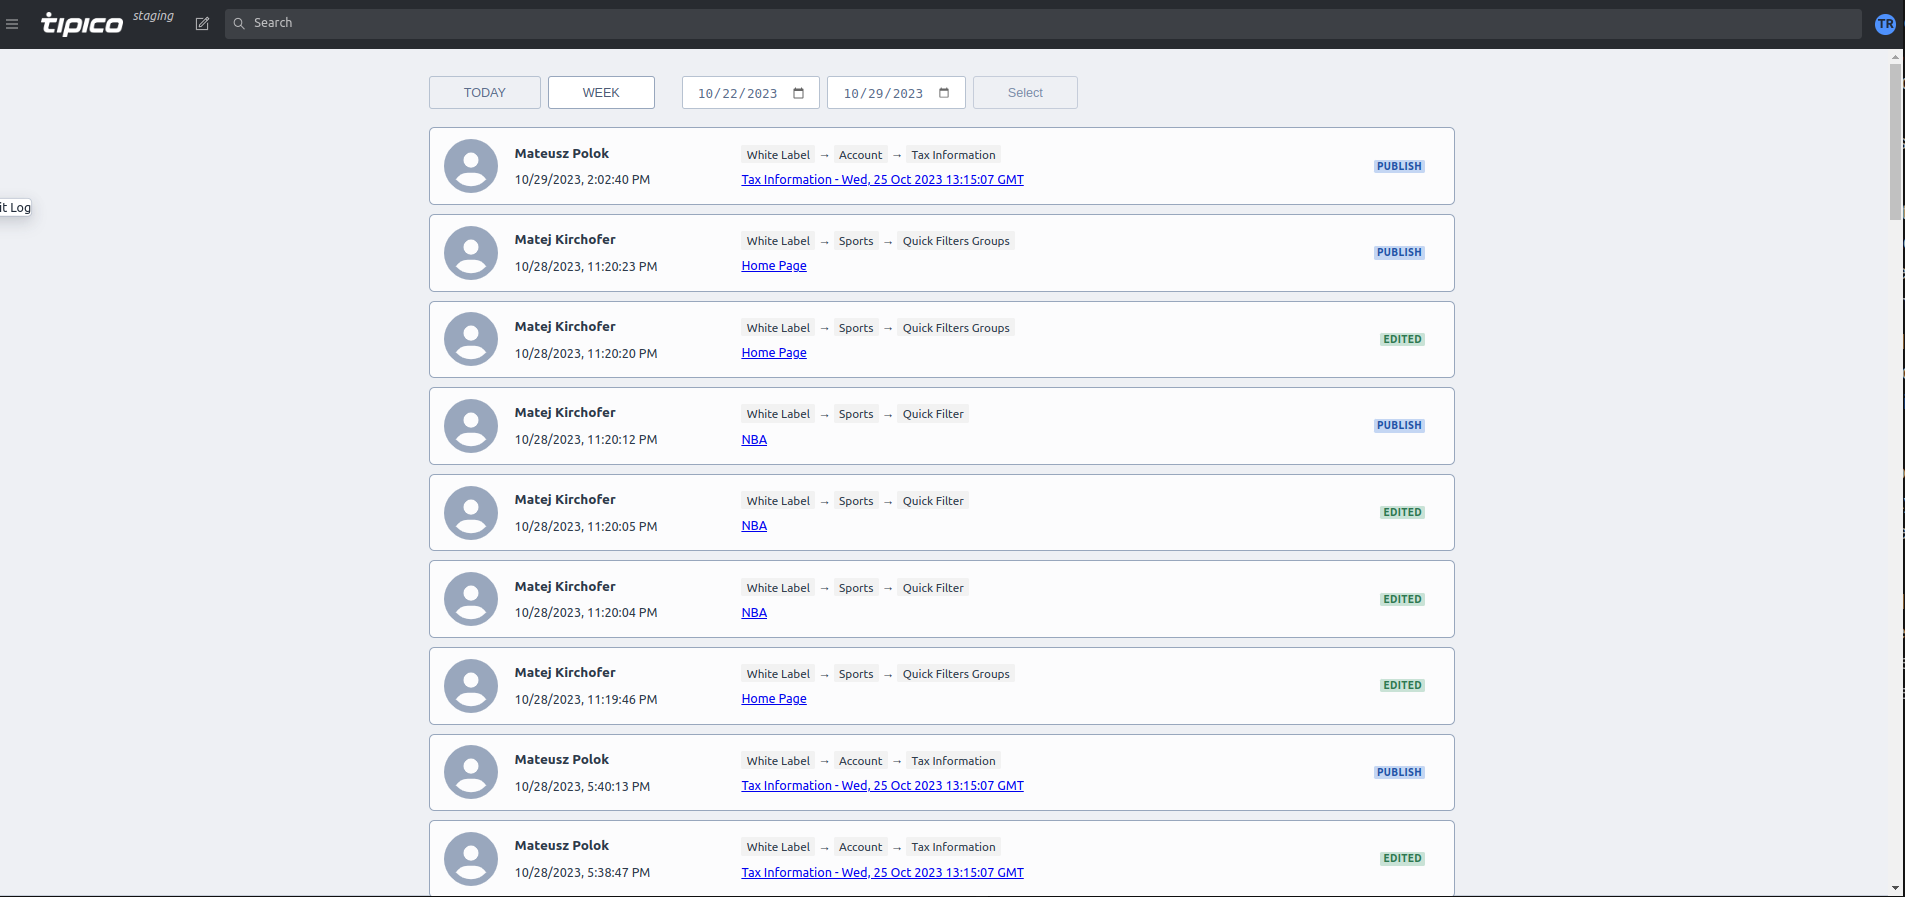 audit log
Having such a complex system, we also had to satisfy one more critical requirement. Company management and regulators should have direct access to information about current and past changes in platform documents. Doing this through a document is impossible, so we developed a special audit log plugin for logging all operations that all editors perform in a CMS. This plugin also supports all the described features, such as custom document actions and a labels system.
8. Custom Grid Input for Implementing Game Tiles on Frontend
The challenge was to develop a custom input to allow editors to organize game tiles on their website, including the mobile version and mobile apps. The grid had a width of 7 columns and an arbitrary number of rows. A game could be different sizes, ranging from 1x1 cell to 2x2 cells. The first three rows had a privilege as they were always visible on a page (while the rest of the rows can be scrollable). The last treat applies an additional requirement - cards that have a height of 2 cells should not be crossed by the bottom line of the third row.
9. GROQ and GraphQL API
Since multiple teams consume content from this CMS, we have to support both GROQ and GraphQL API.
GROQ comes out of the box with Sanity. However, to support all CMS features and specifics, we had to develop and establish an agreement within teams on how we should query documents. For example, we have developed a universal query fragment to handle published and draft document versions.
GraphQL is also a first-class feature in Sanity, but to support it, we had to deploy a GraphQL schema to specific endpoints. The specific aspect of GraphQL is that it has a typed schema and strict type checks per query. These schemas are generated based on a content model at build time. This specificity means that changing anything in document types could potentially introduce breaking changes into a GraphQL schema and, in turn, break frontend queries. To handle this, we switched to a tags basis for teams that consume content through GraphQL. This way, we could freeze a GraphQL endpoint and unblock CMS development. This approach allows us to greatly improve the release processes when they involve frontend, CMS, and content editors teams all together.
Conclusion
While developing this project, we had a fantastic opportunity to gain significant expertise in understanding subtle nuances and deep details of constructing the Sanity Content Lake and Sanity Studio. Since our project was built within the Sanity framework, we occasionally encountered limitations in terms of means and APIs to directly implement certain features.
However, this did not discourage us. With a strong determination to wholeheartedly fulfill the client’s needs, we proactively delved into the source code of Sanity Studio and reached out to Sanity support with inquiries about functionality and missing features. I would like to express my heartfelt gratitude to Sanity support for their outstanding patience and willingness to go above and beyond in assisting us.
The main driving force that guided us in this project was the realization that the client’s needs are of utmost importance. This was especially evident in our efforts to provide a user-friendly and intuitive UX for content editors. It was not always a straightforward task due to the constraints we faced, but we consistently delved deep into the matter to make the most out of every situation.
Moreover, collaborating with multiple frontend teams played a vital role in our work. It was crucial for us to convey the essentials of CMS functionality to them. But even more significantly, we endeavored to provide them with a universal and convenient API for document retrieval.
Currently, we are in the process of migrating Sanity Studio to version 3. Trust me, with the abundance of plugins and custom logic, this is not a simple task. However, as always, we are overcoming challenges using our proven methods. We are confident that as a result, we will deliver an even more convenient and reliable Headless CMS.
If you are seeking a Sanity agency with an extensive understanding of Headless CMS and vast experience in this field, we would be delighted for you to reach out to us. We are interested in projects of any complexity, from intricate endeavors like this one to simpler ones, where we can efficiently deploy a CMS for you in the shortest possible time, thanks to our accumulated expertise.


