

Sanity Headless CMS When Choosing the Right Tech Stack
Choosing a technological stack before creating a product we strive to ensure the speed of development and the possibility of customization to our needs. Often these two requirements are hardly compatible and controversial in their nature. Nevertheless, we strive to select a set of technologies that will allow us to quickly get the result without limiting the flexibility.
In the competition for the ratio of development speed to the result quality, headless CMS are in a good position. They took the best of traditional BaaS services and old-school CMS. Headless CMS can be described as a Backend with a database plus the ability to manage content without developing a special admin application. This frees up our hands regarding the Frontend part and saves time on developing the Backend and administration applications.
However, all ready-to-use solutions have downsides. We at FocusReactive have experience working with such Headless CMS as ‘Contentful’, ‘GraphCMS’ and ‘Sanity’. Each of these CMS offers a good solution “out of the box”, but each one also has its own limitations that we have encountered. One of the weaknesses of Headless CMS is traditionally considered to have poor admin app customization. As a rule, it has sufficient functionality for working with content and some options for extending provided by CMS maintainers.
As software developers, we often want to expand this application to our needs. Such a need arises when we have to work with a complex content model and it is necessary to provide editors with the convenience of finding the necessary information and editing it. Of course, we can develop our own application, but then the advantages of using headless CMS are lost compared to just BaaS services.
Different CMSs solve this problem in their own way. E.g. Contentful proposes to extend the standard UI using custom plug-ins. GraphCMS currently only allows you to customize the properties of the documents lists, but we have developed a Storybook addon, which you can use to form your own documents outputs based on GraphQL requests. Read more about it if you are interested.
 Sanity Logo
Why Sanity caught our attention
In this post, we want to focus on customizing Sanity Studio, the single‑page admin app of Sanity. Sanity intrigued us from the beginning with its ability to customize almost everything. Any Sanity module can be replaced with a custom implementation that still integrates seamlessly with the rest of your application. This means you can update only the components you care about while continuing to rely on the rest of Sanity’s functionality as is.
What is Sanity Studio?
To manage content, Sanity provides Sanity Studio – a client‑side application whose code and configuration live in your Sanity backend project. You can deploy Sanity Studio to any static hosting solution, and Sanity also offers its own hosting by default. This combination of deep customization and a simple “just deploy it” option was a strong signal for us.
At FocusReactive, we recommend Sanity as a backend solution to our clients and use it in our own projects as well. If you’d like to see what a final application can look like, check our clear example: https://reactsummit.com/sponsors/.
Sanity Studio Customization
Let’s start with how Sanity Studio looks out of the box. The default display style is quite universal and suitable for many cases. It allows you to see the structure of the content, select, view and edit documents.
The main part of the application is divided into three columns. The first displays all types of documents available in your scheme. Selecting one of them you will see all available documents of this type in the second column. And finally, choosing a document from the second column, you load it into the editor inside the third section.
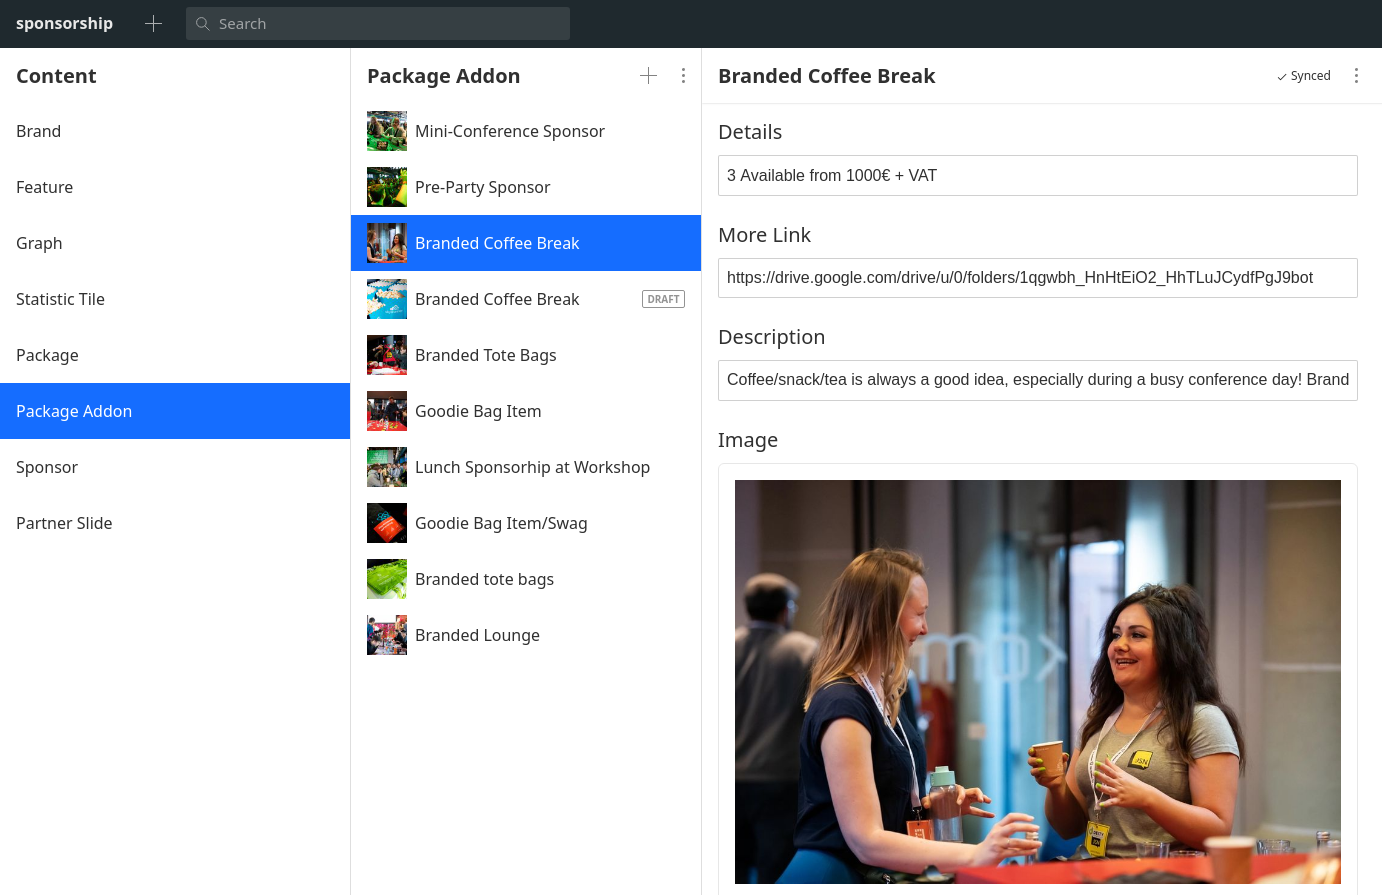 image)
You can see - it’s a rather universal structure and in fact is perfect for starting a project. In many cases you won’t even need to do anything with it in the future.
So why do we ever might want to change the default display order? I think the most common problem here is that Sanity does not know anything about the hierarchy of different types of documents and displays them in a flat list. While in reality, our documents most likely have a structure with a top and a bottom level of documents.
In our example, Brand objects describe conference information and are the root type. Each brand can have its own set of packages (type Package) and each package can have its own add-ons (type Package Addon). Therefore, for greater convenience, we may want to have such layout in the application:
| 1 column | 2 column | 3 column | 4 column |
| Brands | Packages | Package Addons | Editor |
Thus, in the first column we want to display not document types, but all documents of a certain type. In the second column, we need to display only those documents of type Package that relate to the selected brand, and so on.
Fortunately, Sanity Studio has an excellent API for creating your own layout, which allows you to very flexibly configure the structure of the application we need. In order to add your custom layout to Sanity Studio, you need to specify this in the configuration:
// sanity.json

…

{
     "name": "part:@sanity/desk-tool/structure",
     "path": "./customLayout.js"
 }
…
In order to access the methods that control the creation of the layout, let’s import them to our file:
// customLayout.js

 	import S from "@sanity/desk-tool/structure-builder";
Sanity Studio Customization Heatures: Create your Document Hierarchy
To have a column with a list of custom elements, create an object using the method s.list()
doc.
You can set the title of that column with s.list().title(‘ColumnTitle’)
doc.
To display elements, pass an array with them to the items
doc.
Tip 1: you can pass a promise to items that resolves to an array. This will allow you to make server requests to display components matching to the current condition
Tip 2: You don’t need to manually implement the rest right part of the layout displayed when you select an item from the list. You can use the following methods that will do it automatically:
documentTypeList to display all documents of a certain type
documentList to display all documents matching the GROQ request.
If you decide to go your own way and have full control of what and how will be displayed, then the next API method you need is listItem
doc. With it, you can specify the behavior of an individual component in the list. Here you can setup the appearance of the element and the behavior of the right side of the application when selecting this element. For this, you need a method child() doc.
As a child, it usually will be either a nested list or the editing/display form of the corresponding document.
Tip 3: note that since the column components are defined by a regular javascript array, all the usual filtering and sorting methods are applicable to it, which gives you additional options for customizing the contents of the columns
Extending functionality using custom context menu options
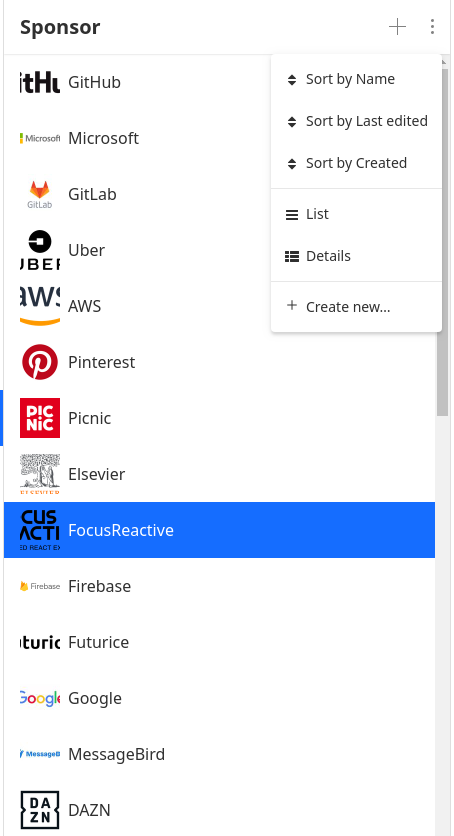
By default, Sanity Studio offers a set of contextual commands for manipulating lists and documents. For example, sorting, switching display types, and adding a new component are available for lists.
 image
image
The document editor also has its own set of commands for publishing, duplicating and viewing details.
 image
image
We can create our own actions and add them using menuItem() doc. To set the operation you should pass a function or actionHandler into action doc
Using own React Components
If the flexibility provided by the API is not enough, you can use your own React components to display documents. To do this, you need to pass the component using the method document().views([]) doc
which accepts an array of standard and custom components. Thus, you can even specify several components for displaying a document.
The component itself is passed using the method component of object view().
Example: https://www.sanity.io/docs/structure-builder-reference#example-a53abfb93713
In addition to creating your own components for displaying the entire document, you can also create a custom component for working with a specific field of your document within the standard document editor. Learn how to make a custom input component in detail.
Extending Sanity Studio with plug-ins
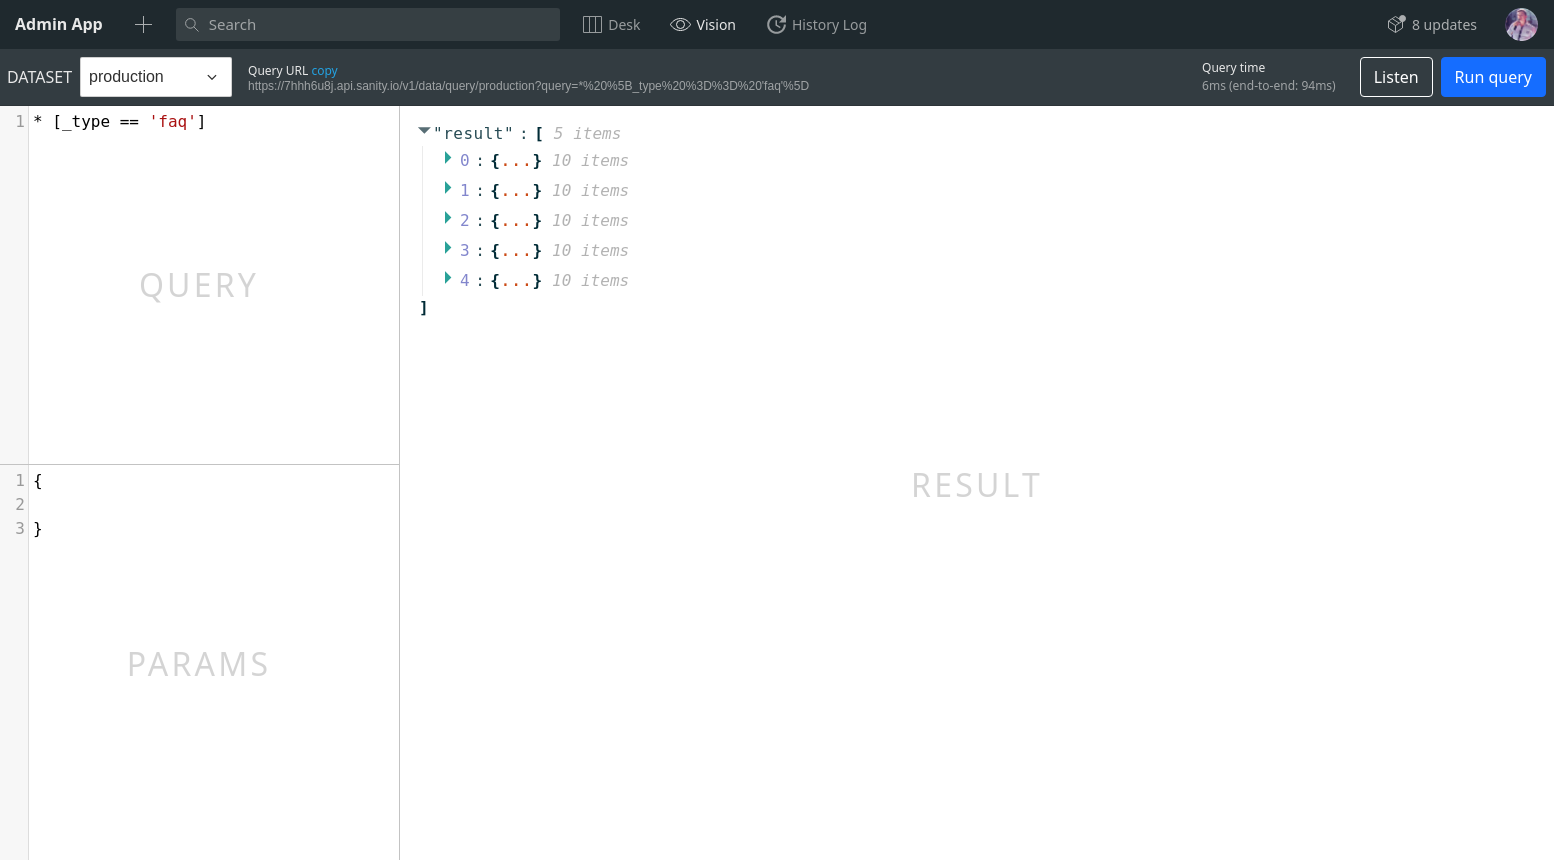
So far, we have considered only the part of Sanity Studio that is related to editing content and despite it’s extremely flexible it was still limited by the structure consisting of columns and list items. However, in addition to this, Sanity CMS allows you to embed completely arbitrary parts into Studio that can behave like separate applications.
 image
image
The plugins can use the entire area below the upper toolbars and their capabilities are unlimited. Sanity already has a fairly large set of plugins ready for use.
In addition, you can develop your own plugin. This is pretty easy to do. The first steps will be as follows:
- Create a folder inside the plugins/ with the name of your plugin
- Add the plugin name to sanity.json in the plugins section
- Go to the created folder and launch the command in terminal
sanity init plugin
Now you can develop your plugin. Index.js file must export plugin data:
export default {
  title: "Custom plugin",
  name: "my-custom-plugin",
  icon: Icon,
  component: PluginApp,
};
The icon for switching to the plugin will appear on the upper toolbar.
Fetching From Database
When developing custom elements, you will often need to get some information from the backend. You may be tempted to use some external client and target it to your endpoint. However, a more correct solution would be to use the client already built into Sanity
You can import it as follows:
import client from "part:@sanity/base/client";
Then you can get the data you need:
const groups = await client.fetch(`
    *[_type == "system.group"]
    `);
Why is using an embedded client better than external? In addition to reducing bundle volume, it also increases the security of your application. The fact is that to access the database you will need to specify an authorization token in the header. At the same time, you may be tempted to keep this token hardcoded in the application bundle. This is, of course, bad from the security point of view since it gives attackers access to the token. Using the built-in client will avoid this problem.
In addition, the built-in Sanity client allows you to make requests on behalf of the logged user and, thus, your tools will be able to display the required information depending on the access level of a specific user.
Why we build with Sanity
After working with several headless CMS platforms, we’ve found that Sanity stands out when a project needs more than standard content editing and requires a tailored editorial experience. Its Structure Builder, plugin system, customizable views, and built-in client make it possible to shape Sanity Studio around complex content models without giving up the speed benefits of a ready-made CMS.
That balance is exactly why we use Sanity for both client projects and our own products: it helps teams move fast at the start, then scale the admin experience as content operations become more sophisticated.
If you’re planning a project where content editors need a custom, efficient, and scalable back office, learn more about our team approaches here: FocusReactive Sanity CMS Agency.


