

Understanding GraphQL Codegen
What is GraphQL Codegen?
GraphQL Codegen (also called GraphQL Code Generator) is an open-source CLI tool that automatically generates type-safe code directly from your GraphQL schema and operations (queries, mutations, subscriptions, and fragments). Instead of manually writing TypeScript types or client hooks, the tool introspects your schema and produces all of that code for you in seconds.
How GraphQL Codegen Works
You define a codegen.yml (or .ts) config file specifying your schema source and desired output plugins. Running the CLI then generates code tailored to your stack — whether that’s TypeScript interfaces, React hooks, resolvers, or other outputs.
What It Generates
-
TypeScript types — fully typed representations of every schema type, query, and mutation
-
Ready-to-use hooks — for Apollo Client, React Query, urql, and other GraphQL clients
-
Resolver typings — for backend/server-side code, ensuring your resolvers match the schema contract
Storyblok is a modern headless CMS that offers developers the flexibility to manage content independently of the presentation layer. It supports GraphQL, enabling precise and efficient data retrieval, which is important for achieving high performance in web applications.
The @graphql-codegen library is a bridge between your GraphQL schema and the actual code you write. It automates the generation of boilerplate code, ensuring that your data fetching layer is always up to date with your content structure.
Combing the power of code generation in Storyblok projects, we eliminate the disconnect between frontend applications and the CMS backend. In the following sections, we’ll explore how to set up and benefit from this powerful integration, step by step.
In this article, we will detail the process of integrating these powerful tools. The aim is to streamline data fetching from Storyblok, simplifying it into a few straightforward steps:
- Write the necessary GraphQL query for the data you require
- Run GraphQL Codegen to transform these queries into usable code
- Learn how to utilize the generated utilities to retrieve this data efficiently
 GraphQL Codegen SDK example in code
Additionally, for a comprehensive understanding and hands-on experience, we have made available a repository containing the final result of this integration. You can access and explore this repository at FocusReactive’s Demo Storyblok GraphQL Codegen.
This resource provides a practical reference, allowing you to see the integration in action and to use it as a starting point for your projects. Also, you can use this demo as a tool for generating types for your existing project, simply add your queries to the src/graphql directory and insert your token into the .env.local file.
Viewing and fetching the Storyblok GraphQL schema
To kickstart the process of integrating GraphQL Codegen with Storyblok, you first need to understand how to access and utilize the GraphQL schema provided by Storyblok. Fortunately, Storyblok offers a straightforward way to view your GraphQL schema. You can access it at https://gapi-browser.storyblok.com/?token=<STORYBLOK_API_TOKEN>, but don’t forget to replace STORYBLOK_API_TOKEN with your actual token.
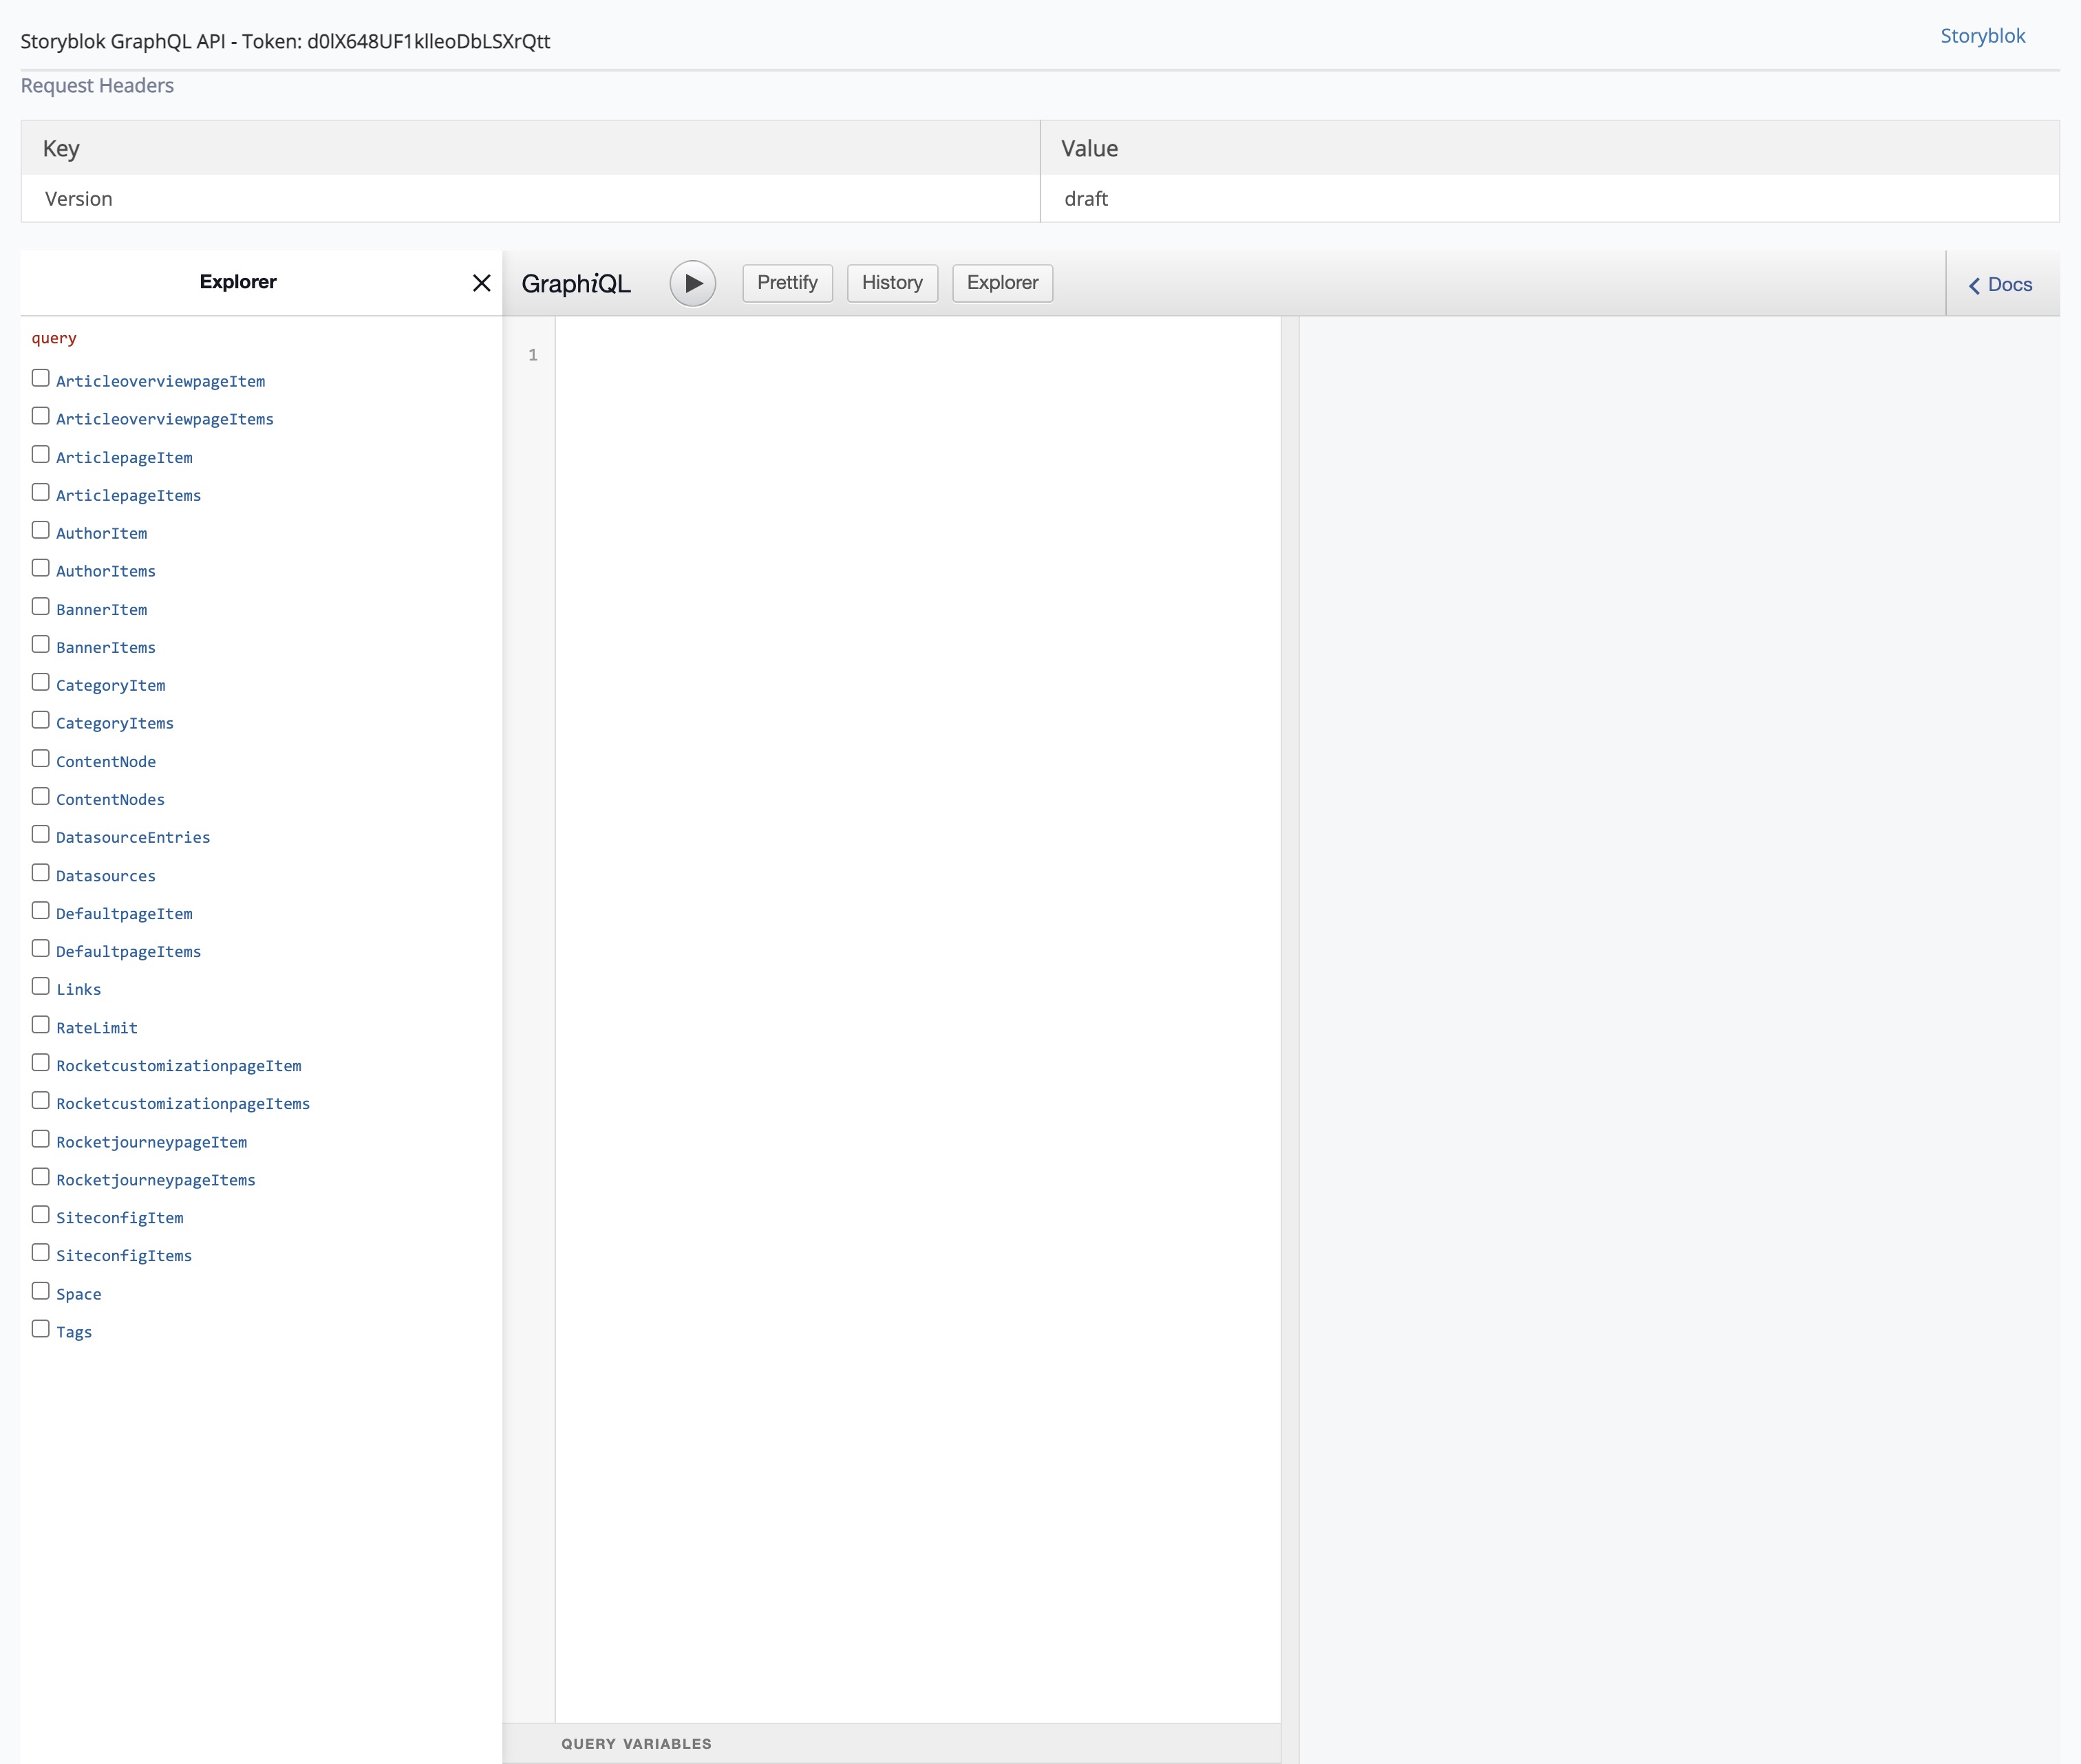 Storyblok GraphiQL interface
GraphQL Codegen CLI Installation
The first step is to set up all necessary tools and save the schema right inside your project. Let’s install the GraphQL Codegen CLI and required dependencies:
npm i graphql
npm i -D typescript @graphql-codegen/cli @graphql-codegen/schema-ast
- @graphql-codegen/cli is the heart of the operation, orchestrating the generation of types and operations from your GraphQL schema
- @graphql-codegen/schema-ast plugin allows us to download the schema directly in our development environment
Initial codegen configuration
Once the tools are in place, it’s time to configure them to work with your Storyblok project. The reason why we want to store schema inside the project is to ensure that your IDE can provide helpful autocompletion and syntax highlighting.
Here’s a template for your codegen.ts configuration using the schema-ast plugin to connect to Storyblok and fetch the schema:
import type { CodegenConfig } from '@graphql-codegen/cli';
import { loadEnvConfig } from '@next/env';

// if you're using Next.js
loadEnvConfig(process.cwd());

const config: CodegenConfig = {
  overwrite: true,
  generates: {
    'src/generated/storyblok.graphql': {
      schema: {
        'https://gapi.storyblok.com/v1/api': {
          headers: {
            token: process.env.STORYBLOK_API_TOKEN!, // don't forget to add your token
            version: process.env.NODE_ENV === 'production' ? 'published' : 'draft',
          },
        },
      },
      plugins: ['schema-ast'],
    },
  },
};

export default config;
The above configuration assumes that you’re using a Next.js application where you can use the @next/env package to manage your environment variables. If you’re not working with Next.js, you can use the dotenv package or similar to load your environment variables.
Before running the codegen command, make sure to set your STORYBLOK_API_TOKEN in your environment variables. Once that’s done, you can run codegen to generate the schema file:
graphql-codegen
By executing this command, the GraphQL schema from Storyblok will be fetched and stored locally in your project, allowing for a more integrated and efficient development workflow.
Configuring GraphQL Codegen for Storyblok
With the GraphQL schema from Storyblok in hand, the next step is to expand GraphQL codegen configuration. This will enable you to generate type-safe operations and types that correspond with your Storyblok components and queries.
At FocusReactive, we specialize in building high-performance Next.js applications that benefit from static generation for maximum efficiency. Our preferred setup involves fetching data from a CMS at build time, ensuring our static pages are populated with the latest content without compromising on speed.
For Next.js projects, one of the options can be the typescript-graphql-request plugin. Under the hood this plugin works with the graphql-request library — a minimal, flexible, and easy-to-use GraphQL client. With typescript-graphql-request, we generate an SDK that is fully typed and allowing us to make strongly-typed GraphQL requests. This nicely integrates with data fetching in Next.js Server Components, enabling us to pre-render pages with data from Storyblok.
Write sample GraphQL query
Writing a GraphQL query for Storyblok starts with understanding your content types and what data you need to retrieve. Here’s a simple example of a GraphQL query to fetch story with a specific content type:
query posts {
  PostItems {
    items {
      uuid
      content {
        body
        intro
        title
      }
    }
  }
}
This is what the Post content type looks like inside Storyblok:
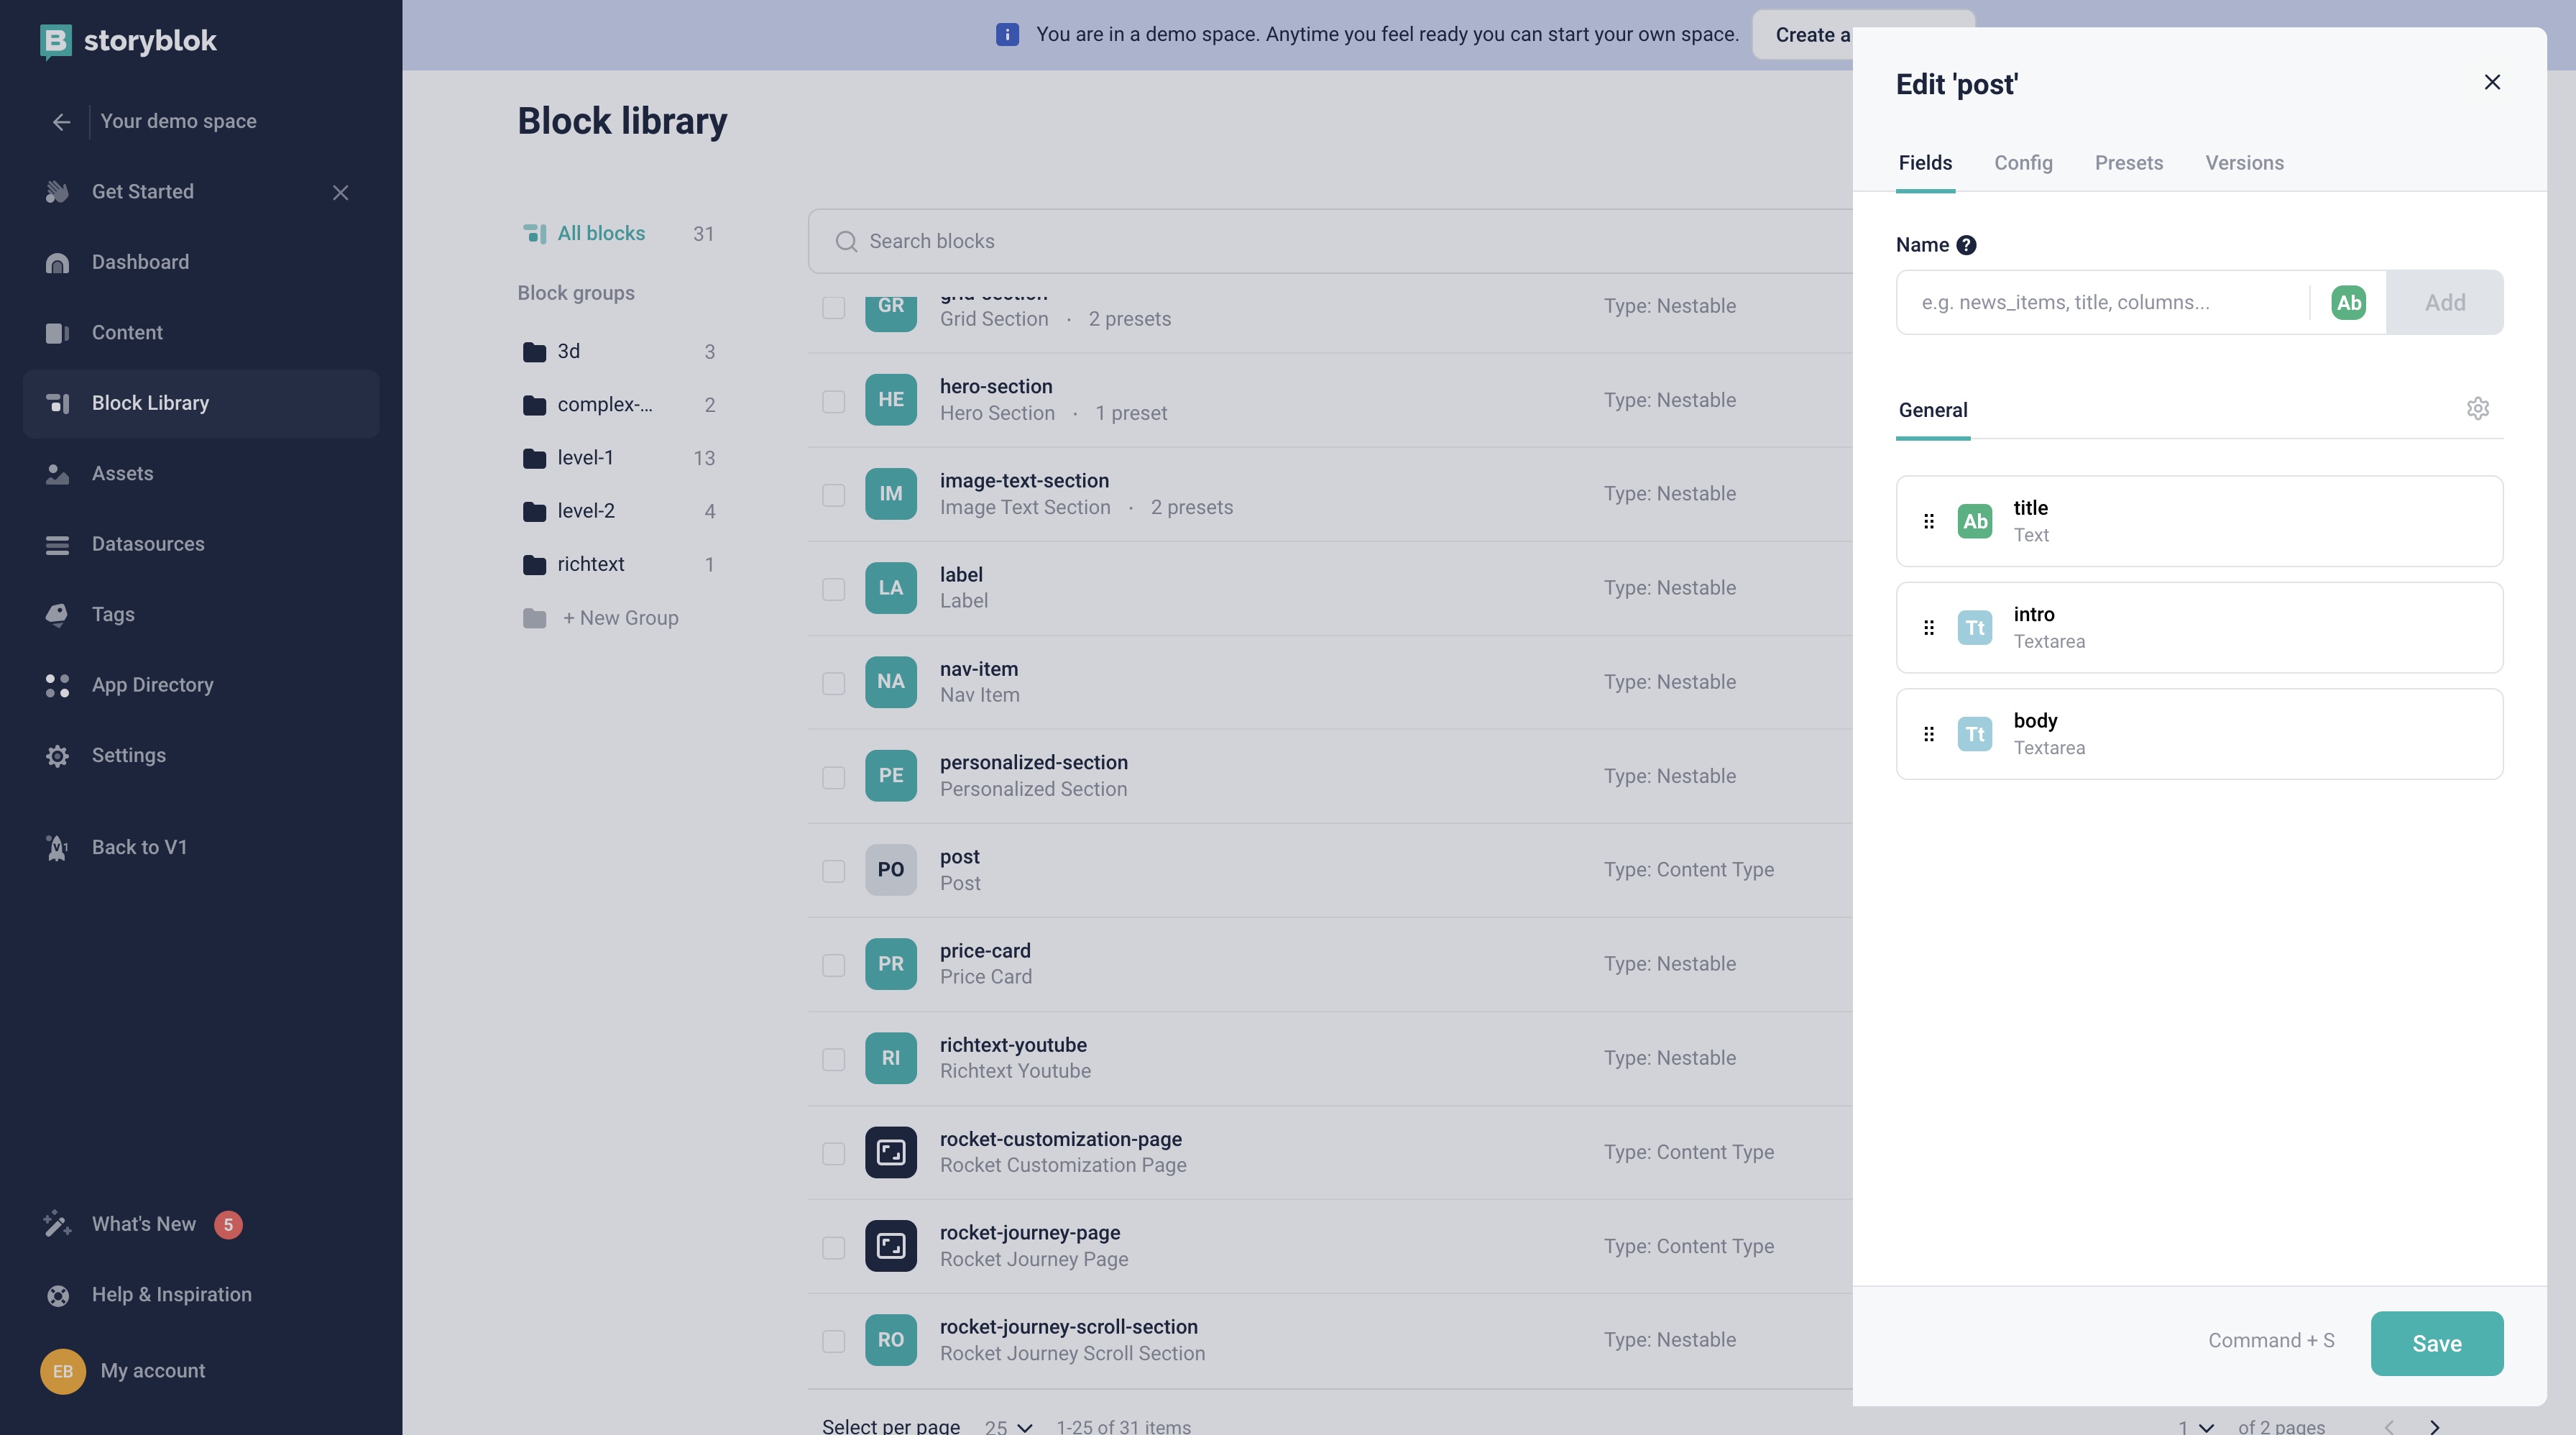 Post content type Storyblok interface
To ensure that this query is valid for your Storyblok project, you can test it using GraphiQL, as shown below:
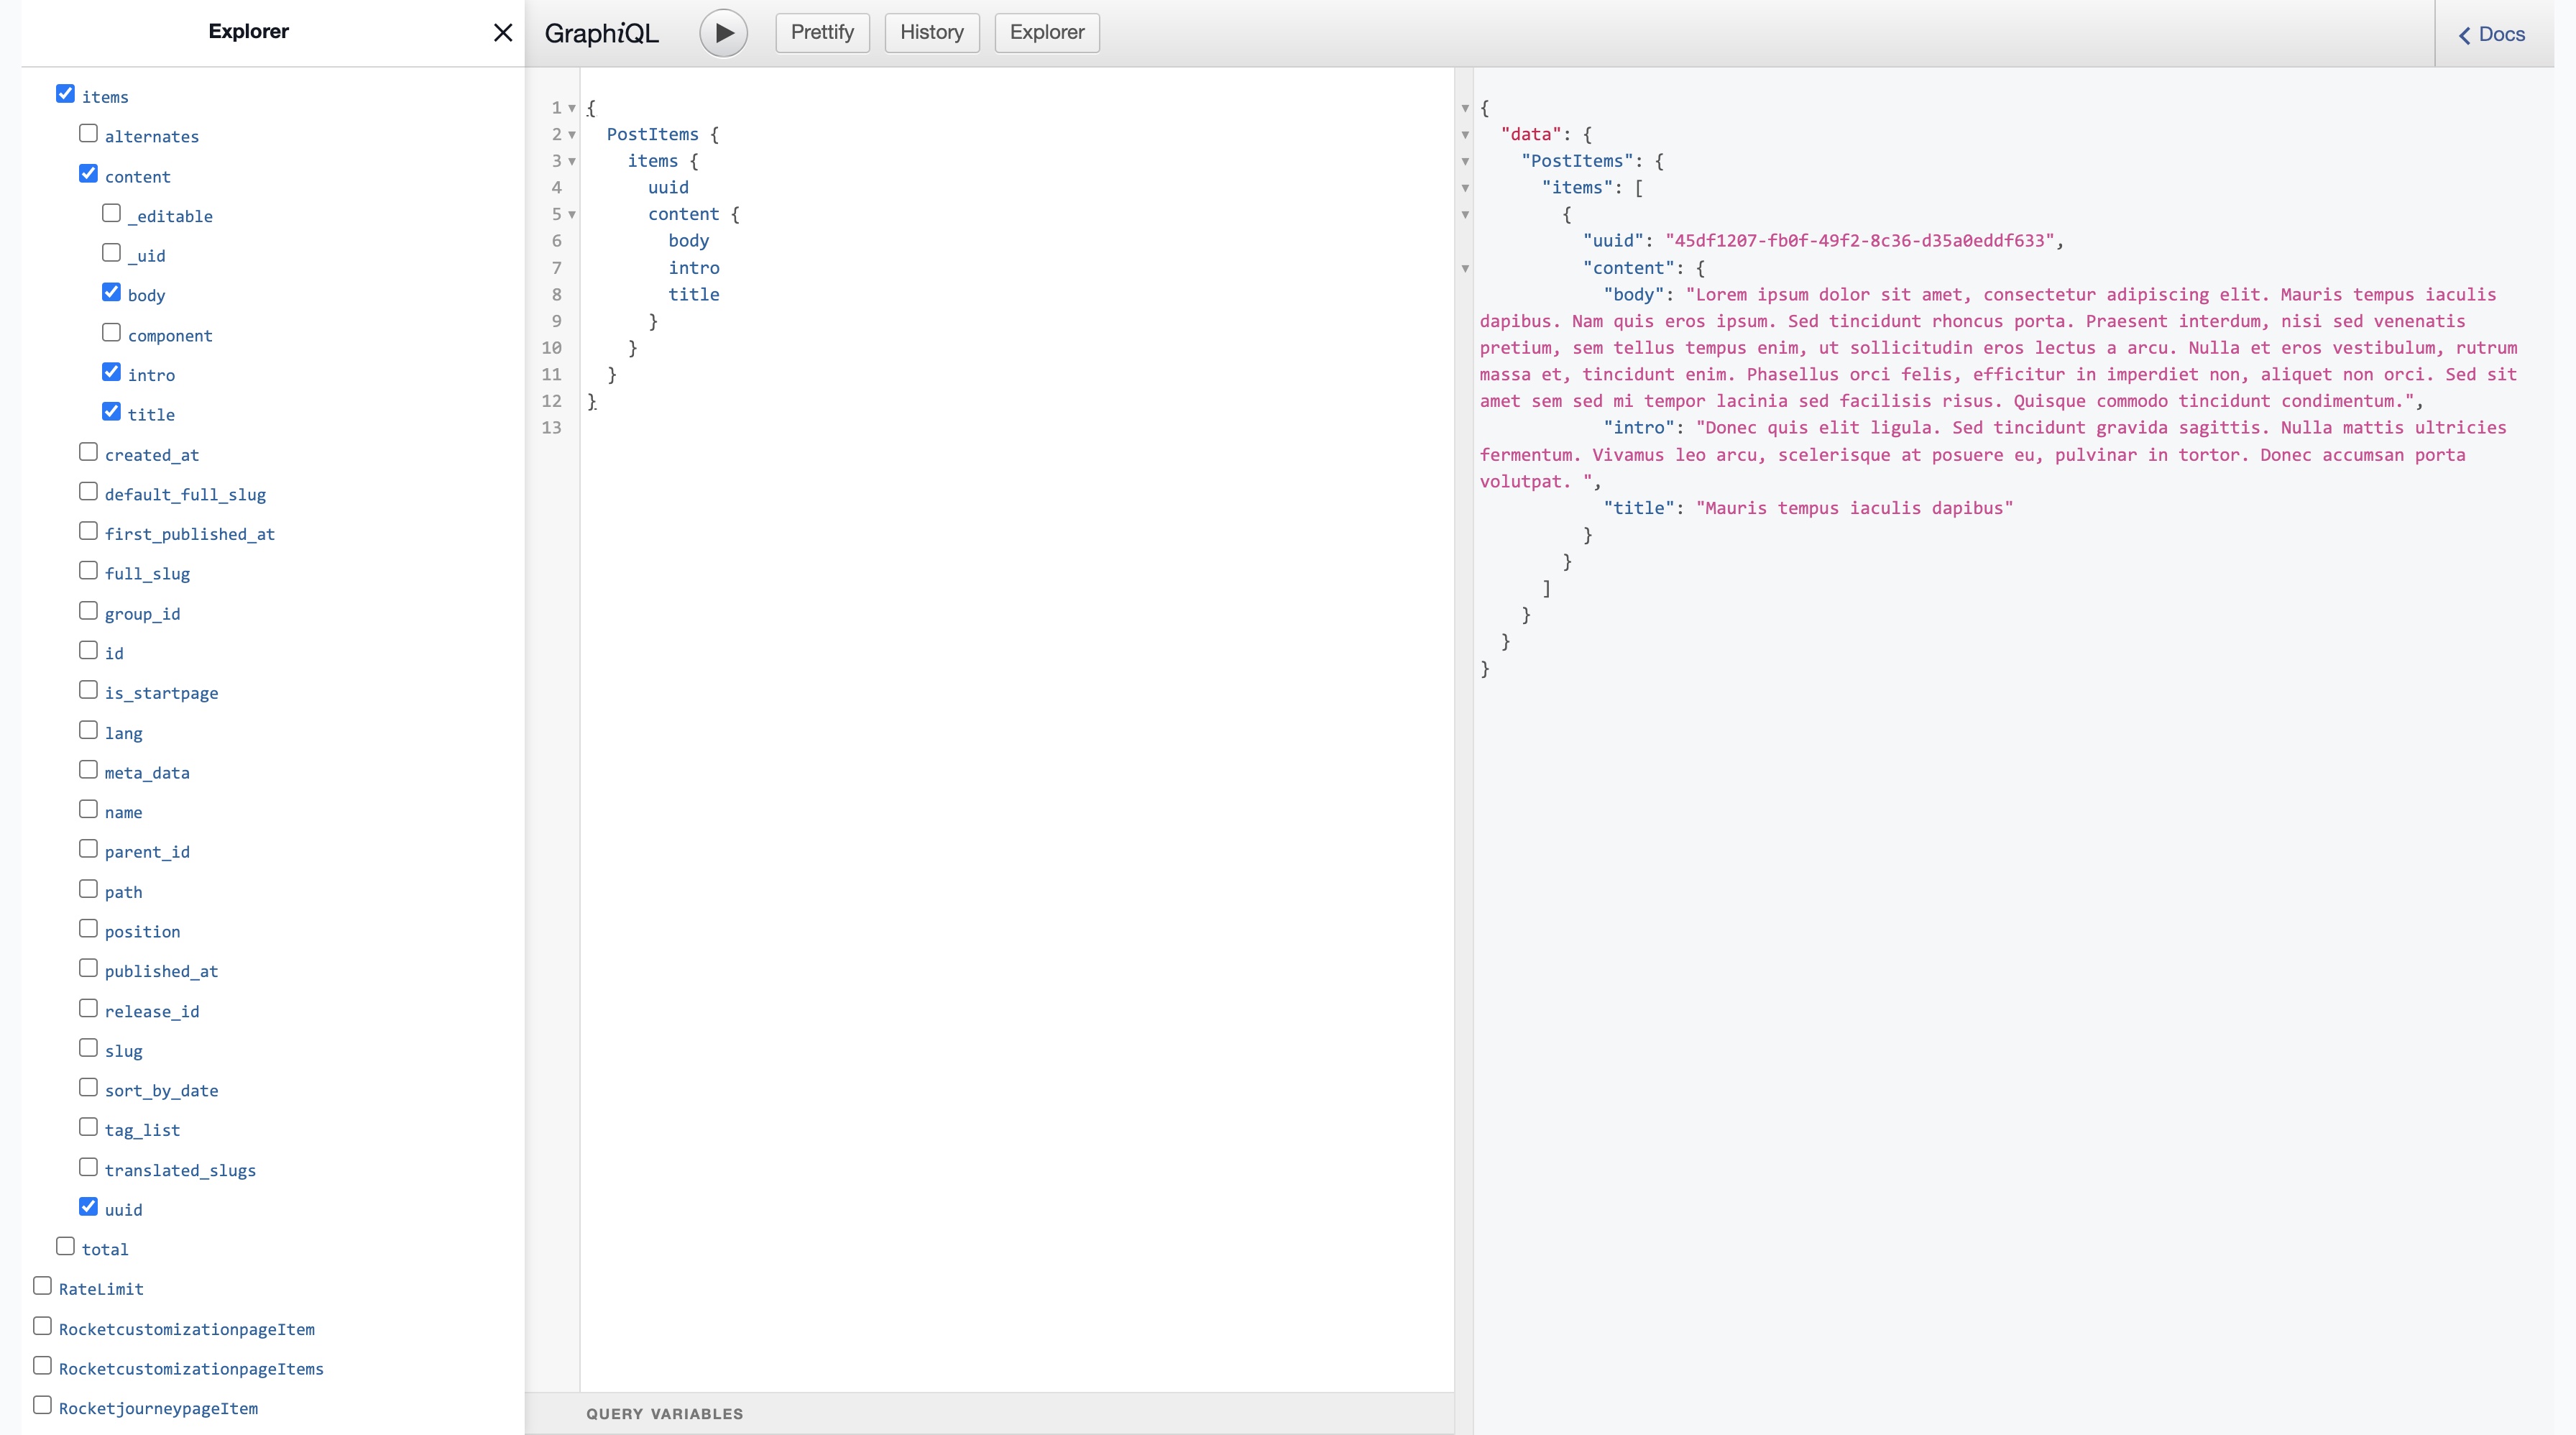 Example of posts query in GraphiQL
Modify config to target this query
Now, let’s adjust the codegen.ts configuration to target the newly created query file:
const config: CodegenConfig = {
  overwrite: true,
  generates: {
    'src/generated/storyblok.graphql': {
      schema: {
        'https://gapi.storyblok.com/v1/api': {
          headers: {
            token: process.env.STORYBLOK_API_TOKEN!,
            version: process.env.NODE_ENV === 'production' ? 'published' : 'draft',
          },
        },
      },
      plugins: ['schema-ast'],
    },

    'src/generated/storyblokSdk.ts': {
      documents: ['src/graphql/**/*.graphql'],
      schema: {
        'https://gapi.storyblok.com/v1/api': {
          headers: {
            token: process.env.STORYBLOK_API_TOKEN!,
            version: process.env.NODE_ENV === 'production' ? 'published' : 'draft',
          },
        },
      },
      plugins: ['typescript', 'typescript-operations', 'typescript-graphql-request'],
    },
  },
};
The plugins define the output of the code generation process. You’ve already included some basic plugins:
- typescript - generates TypeScript definitions from your GraphQL schema
- typescript-operations - creates TypeScript definitions for your GraphQL queries
- typescript-graphql-request - generates a ready-to-use SDK, which is essentially a set of types and functions
Don’t forget to install new packages:
npm i -D @graphql-codegen/typescript-operations @graphql-codegen/typescript-graphql-request
Run codegen
Let’s run codegen again and check the generated output:
graphql-codegen
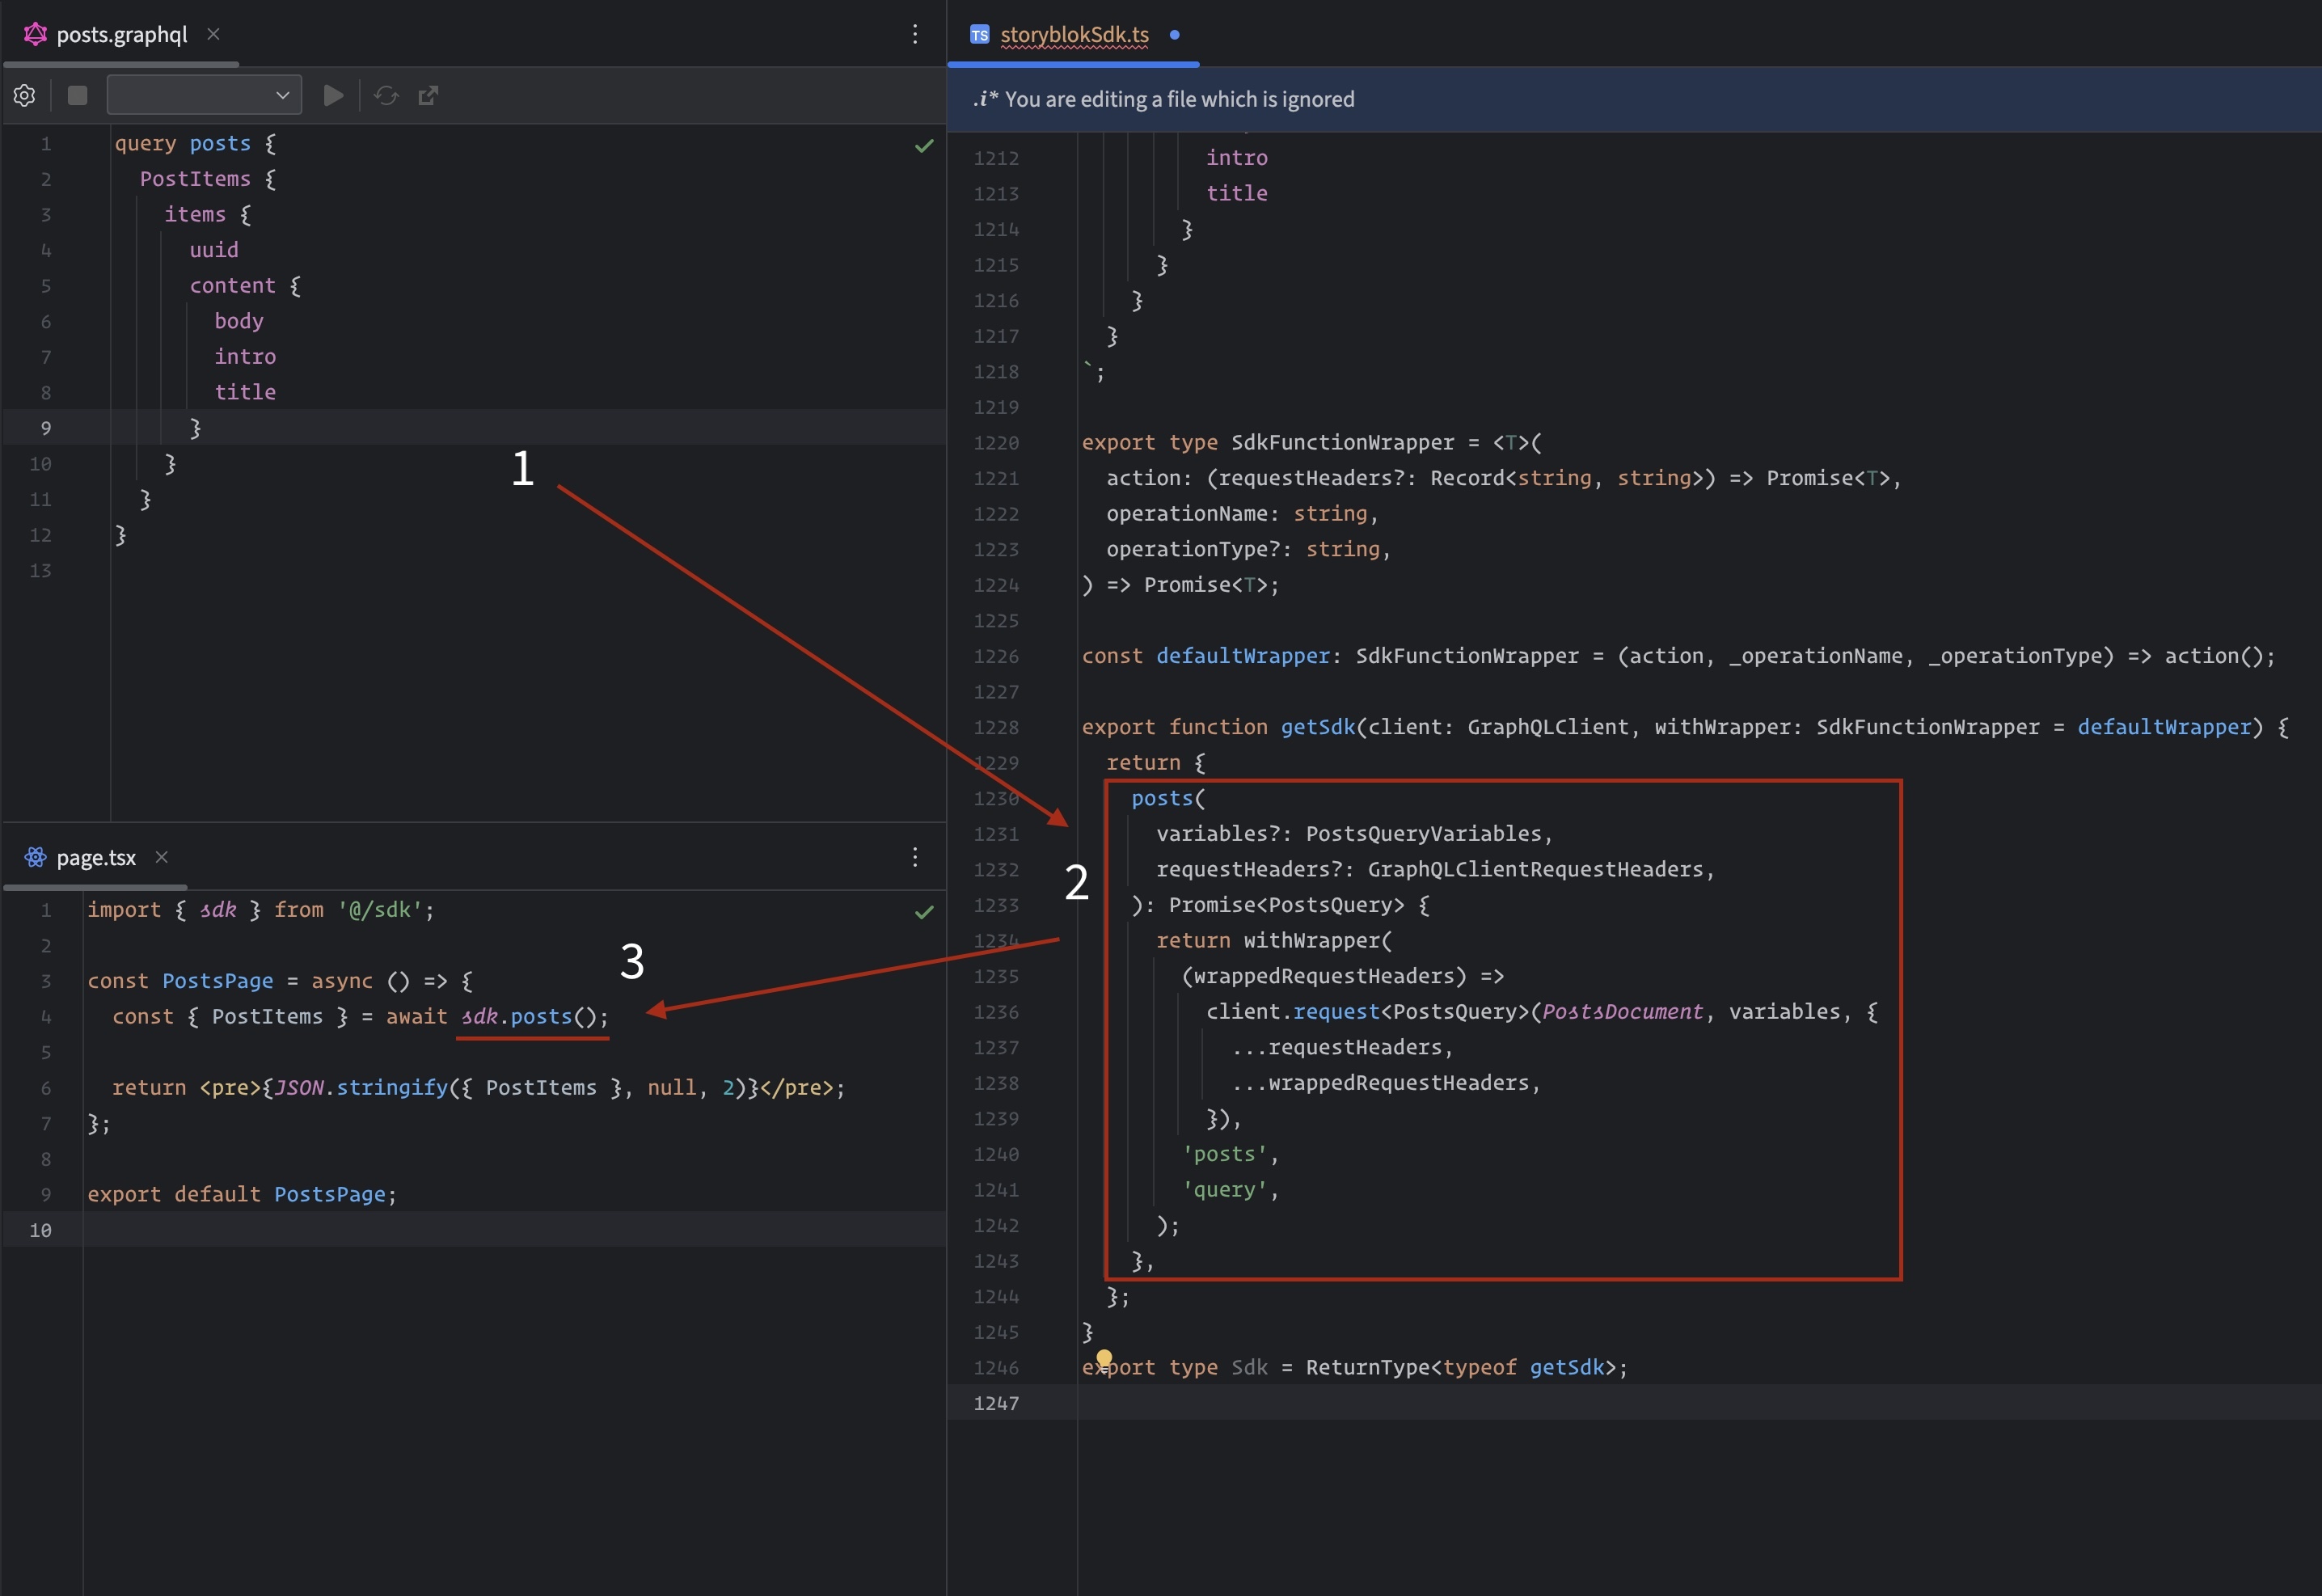
Now, the generated code should include an SDK. The SDK provides a function for each of your GraphQL query, already typed with the appropriate variables and return types.
For example, alongside the types for your schema, you’ll have functions like these:
// src/generated/storyblokSdk.ts

import { GraphQLClient } from 'graphql-request';

export function getSdk(client: GraphQLClient) {
  return {
    posts(variables?: PostsQueryVariables) {
      return client.request(PostsDocument, variables);
    },
    // ... other operations
  };
}
Use the SDK in your application
To use the SDK in your application, create an instance of GraphQLClient and pass it to getSdk:
import { GraphQLClient } from 'graphql-request';
import { getSdk } from './generated/storyblokSdk';

const client = new GraphQLClient('https://gapi.storyblok.com/v1/api', {
  headers: {
    token: process.env.STORYBLOK_API_TOKEN!,
    version: 'draft' // you don't need token when fetch 'published' content
  }
});

export const sdk = getSdk(client);
Now, you can use the SDK functions in your components or services:
const PostsPage = async () => {
  const { PostItems } = await sdk.posts();

	// ...
};
With graphql-request and the generated SDK, you are now equipped with a powerful, typed layer to make requests to your GraphQL API. This pattern is especially beneficial for projects that may not need the complexity of a more comprehensive solution like Apollo Client but still want to maintain strong typing with minimal overhead.
Advanced techniques and customizations
One nasty aspect of the generated types is that many fields, including essential ones like id and slug, are marked as optional. This often leads to an excess of null-checks in your code, which can be cumbersome. To address this, we can apply a simple hack to simplify working with generated typings:
// ...
'src/generated/storyblokSdk.ts': {
      documents: ['src/graphql/**/*.graphql'],
      schema: {
        'https://gapi.storyblok.com/v1/api': {
          headers: {
            token: process.env.STORYBLOK_API_TOKEN!,
            version: process.env.NODE_ENV === 'production' ? 'published' : 'draft',
          },
        },
      },
      plugins: ['typescript', 'typescript-operations', 'typescript-graphql-request'],
      config: {
        // all fields in the schema are optional
        // but we don't want to check for fields like `slug`
        // so, all the validation lies on the shoulders of devs
        avoidOptionals: true,
        maybeValue: 'T',
      },
    },
// ...
With the avoidOptionals option set to true, the generated types will treat fields as non-optional. The maybeValue specifies how nullable values are represented. Below a comparison to illustrate the difference:
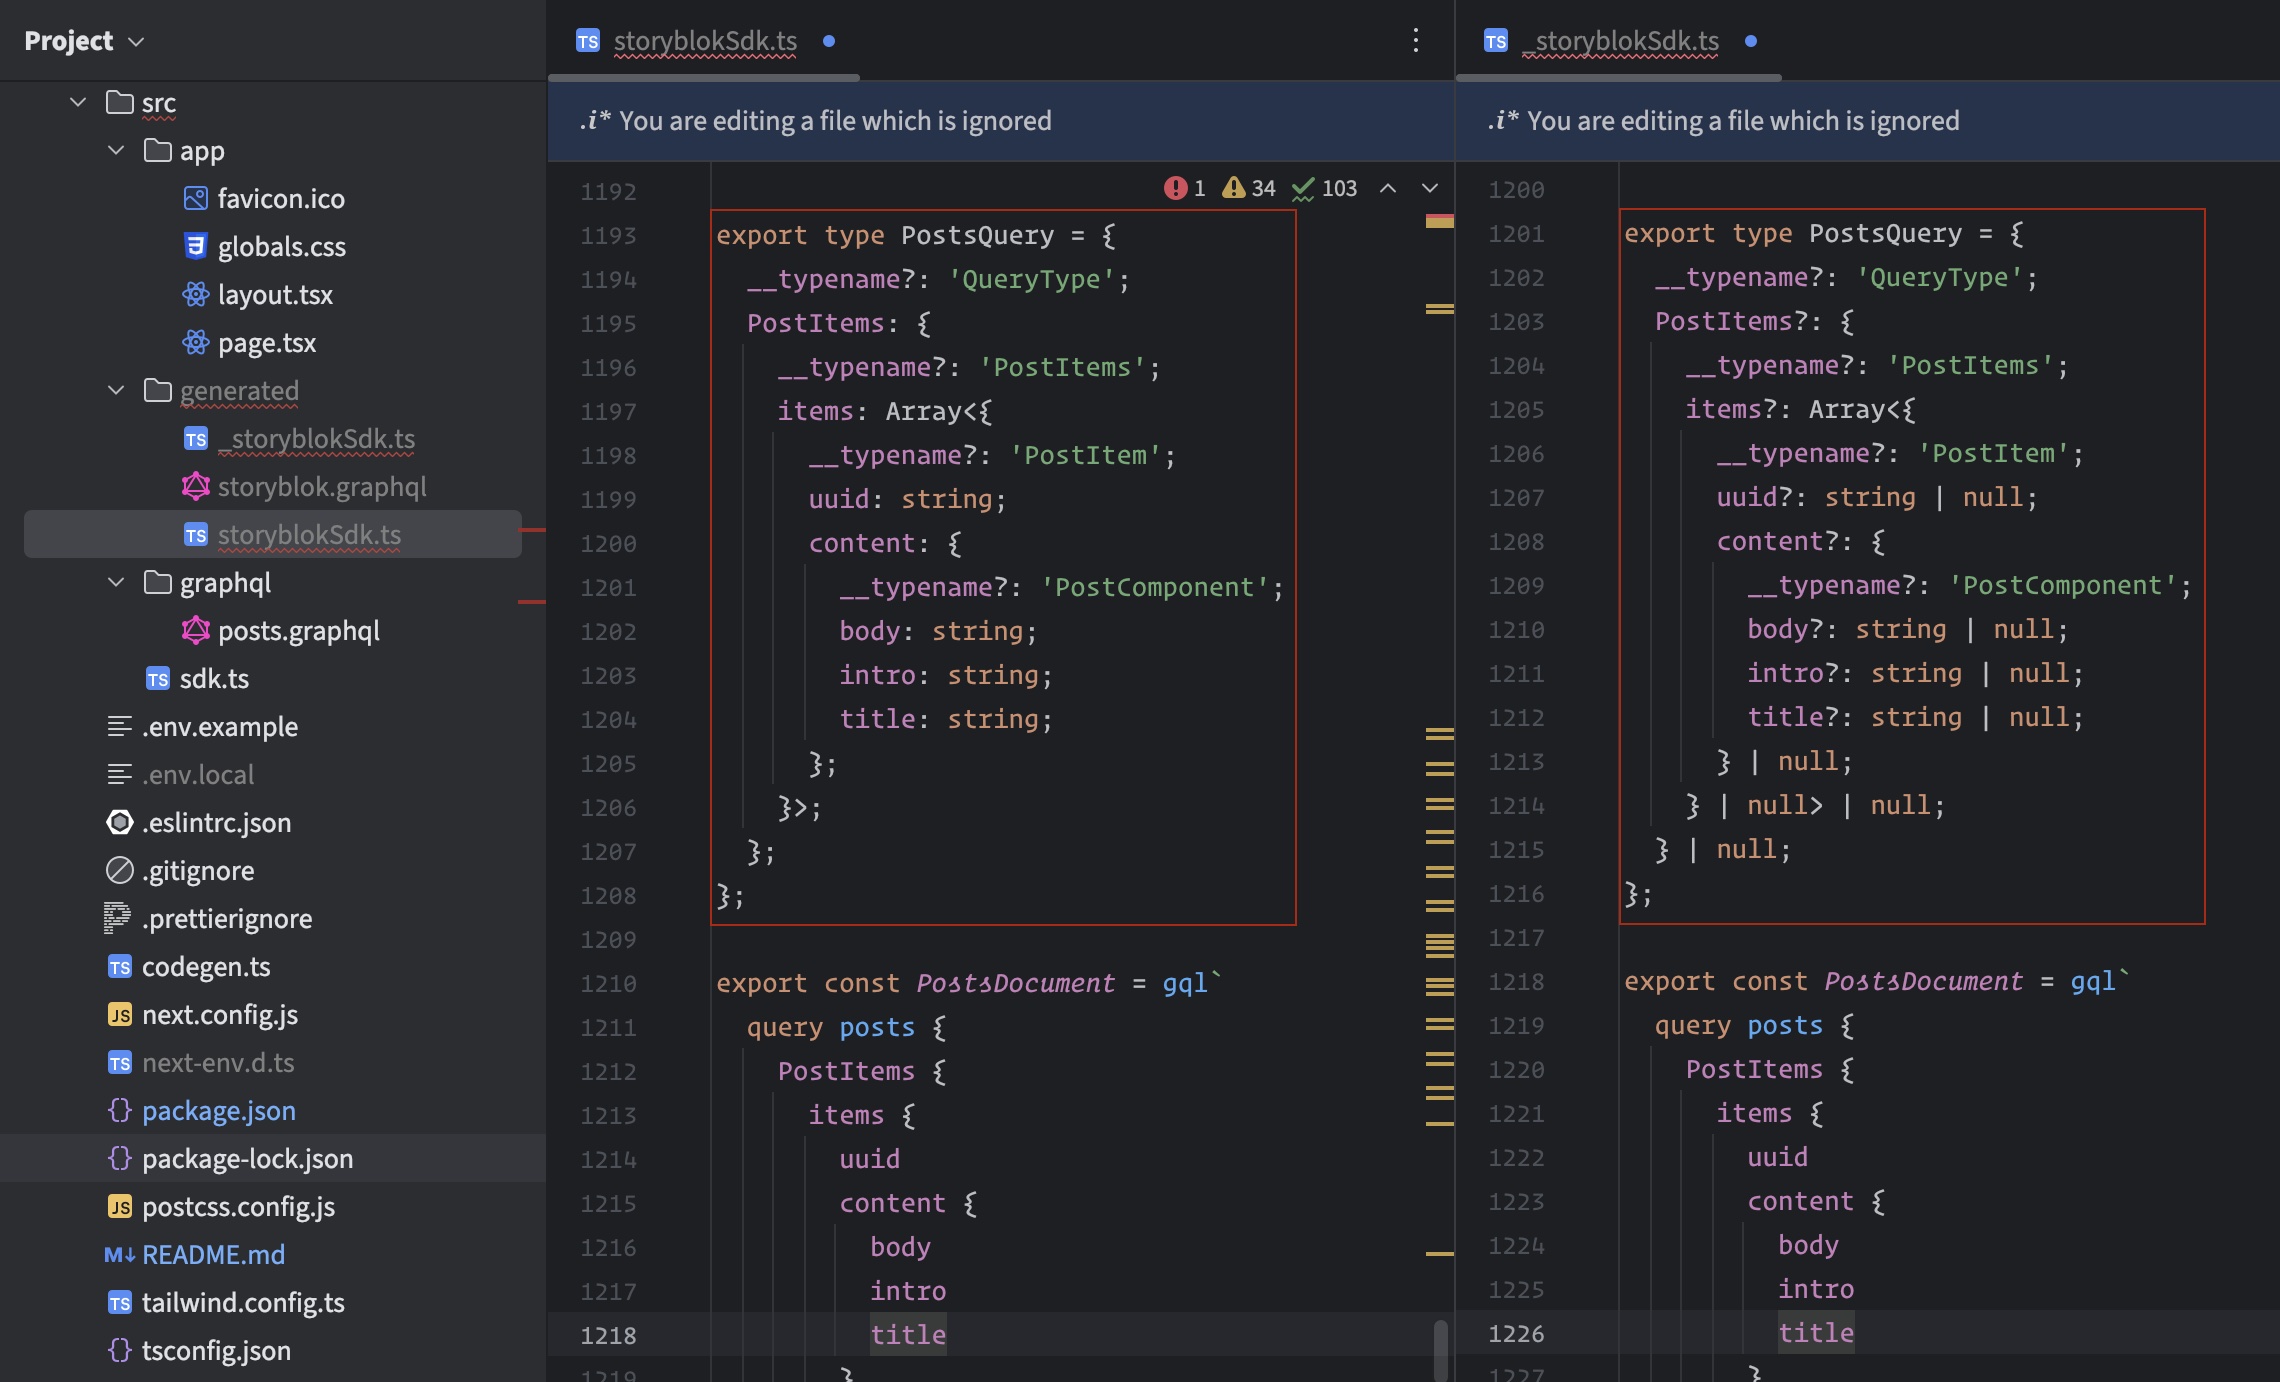 Difference in typings with avoidOptionals and maybeValue
This change eliminates many conditional statements but also increases risk, so it should be used wisely. Making fields non-nullable assumes that they will always be present in the response and responsibility of validation shifts more to the development side. Error handling becomes crucial, especially when dealing with dynamic content from the CMS.
Benefits of this integration
Integrating GraphQL Codegen with Storyblok brings several key advantages that can significantly enhance the development process and the overall quality of the project.
Streamlined development process
The automatic generation of types and operations reduces the need for manual updates and lowers the chance for human error. It ensures that developers always have up-to-date code that reflects the current state of the Storyblok content schema.
Automatic typings update after schema changes
Whenever the content schema in Storyblok changes, GraphQL Codegen can automatically update the typings in your project. This guarantees that the frontend code remains consistent with the backend without requiring any manual intervention.
Enhanced developer experience
Developers can enjoy a more productive workflow with less context switching. They no longer need to manually check the schema or write types by hand. Instead, they can focus on building features and improving the user interface.
Next Steps
As you integrate these tools and practices into your projects, you’ll likely find that the initial effort pays off quickly. Your development process becomes more streamlined, you minimize bugs related to data handling, and you can iterate on your components and features much faster.
Embrace the practices outlined in this guide to boost your development speed, improve your code quality, and build a better experience for both developers and end-users.
By following the steps we’ve discussed, you are well on your way to creating an efficient development environment that leverages the best of GraphQL and Storyblok.
Conclusion
In this article, we’ve explored how GraphQL Codegen can be integrated with Storyblok to improve your development workflow. From setting up and fetching the Storyblok GraphQL schema to generating type-safe code and utilizing a typed SDK, this integration provides a foundation for building dynamic and scalable applications. If you need help with your Storyblok implementation, our Storyblok agency team is here to help.


